Showing posts with label recipe. Show all posts

Sunday, September 25, 2016

Eggless Lemon Bars


A few weeks ago, my cousin L and I had a friend over for dinner. I also had a single overripe banana sitting around waiting to be either used or dumped. Since I am no fan of dumping food, I looked for a way to use it up.

Banana bread requires at least 3 bananas, and so did my banana brownies. I then recalled a recipe I had stumbled upon for an eggless version of lemon bars, from Heart of a Baker. Not that I had ever tasted any classic lemon bars, I opted to give it a try.

First, I lined a small pan with my usual pâte brisée (shortcrust pastry), which I baked for about 10 minutes. Then I filled it with the lemon filling, and baked it some more. The result was a zingy, fresh bar that smelled like banana but tasted 100% lemon.


LEMON BAR RECIPE
  Ingredients
  Procedure
  1. Prepare the crust in an 8 in. x 8 in. pan as per the shortcrust pastry recipe. Precook 10 mins.
  2. In a bowl, mash the banana.
  3. Add in the rest of the ingredients.
  4. Pour into the crust.
  5. Bake for 30 mins at 180˚C or until set.
  6. Cool then refrigerate min. 1 hour.
  7. Cut into squares or bars.
  8. Dust with icing sugar before serving.

Tuesday, August 2, 2016

Mint Chocolate Truffles


I like watching cooking videos on Youtube, and I once went on a Gordon Ramsay spree. In a two-part video, he made mint chocolate truffles with his children. Those are what I tried to make for my friends and to give to the staff of a tea house where my friend works.

The video doesn't give the proportions of ingredients, so I got them off Good to Know. I did change a few proportions myself, but more on that in the recipe below. For a few ingredients (butter, sweeteners), I simply eyeballed the amount. I also used as much chocolate as I had, and scaled down the rest of the ingredients based on that.


RECIPE
  Ingredients
  • 500 g dark chocolate, chopped
  • 500 mL heavy cream
  • 1 small bunch fresh mint
  • 100 g butter, softened
  • honey/brown sugar, to taste
  • unsweetened cocoa powder
  Procedure
  1. Lightly bruise the bunch of mint to release its fragrance. Put it in a pot with the cream.
  2. Heat over medium-low heat until bubbling.
  3. In a heat-proof bowl, put chocolate and butter.
  4. When the cream bubbles, mix in sweetener.
  5. Strain hot cream into the chocolate. Mix until chocolate is melted and smooth.
  6. Pour in a wide, dish. Let cool to room temperature, then refrigerate at least 1 hour.
  7. When cold, take teaspoonfuls out, roll into balls, and drop in a plate of cocoa powder. Roll around to coat.
  8. Eat within 3-4 days.

Tuesday, February 2, 2016

Black Forest Cake (No Liquor)


For a first hallway dinner of the semester, I opted once again to make dessert. As it is still the beginning of the semester, and my workload is still manageable, I decided to make something a little fancier than plain cupcakes or something.


One unfortunate side effect due to my procrastination is that I tend to start baking kind of late. In the winter, this means that by the time I have a finished product, I'm required to take pictures with indoors lights instead of natural daylight. This leads to a lot of pictures that are more on the yellow side... As this cake was eaten about an hour after it was baked, I could not wait until tomorrow to take pictures.

I signed up for dessert, as usual, but this morning, I still did not know what to make. On a whim, I opted for chocolate cake. Then the thought of "Black Forest Cake" popped into my head, so I worked towards that. The chocolate cake recipe is from Minimalist Baker.


After the cake was baked, I cut it in half, and put a layer of whipped cream and a layer of cherries (from a jar of pitted cherries, with the juice thickened with some cornstarch). I closed it off with the second layer, more whipped cream, and 8 cherries I had reserved. The rest of the surface was covered in shaved milk chocolate (all I had in stock), as I did not have time to pipe a pattern with the cream, as I had originally intended.


The cake recipe yielded an extremely moist cake that went well with the cherries. Upon hindsight, the cake would have been much better if the top also had an entire layer of cherries, but I had not purchased enough, so had to make do with what I had. Except for the whipped cream, this cake is vegan.

RECIPE
  Ingredients

     Chocolate Cake (adapted from Minimalist Baker)
  • 1 1/2 cup unsweetened almond milk
  • 2 tsp vinegar (white or apple cider)
  • 1 1/4 cup apple sauce
  • 1/2 cup strong brewed coffee (I used decaf)
  • 2/3 cup melted coconut oil, or other neutral oil
  • 1 packet vanilla sugar, or 1 tsp vanilla extract
  • 2 cups + 2 tbs flour
  • 3/4 cup cane sugar
  • 1 cup unsweetened cocoa powder
  • 2 tsp baking soda
  • 1 tsp baking powder
  • 1/4 tsp salt
     Topping
  • 1 jar or can pitted cherries
  • whipping cream (use non-dairy cream for vegan option)
  • icing sugar (optional)
  • chocolate
  Procedure

     Chocolate Cake
  1. Preheat oven 176˚C.
  2. In a mixing bowl, mix almond milk and vinegar. Set aside a few minutes to activate.
  3. Add oil, coffee, applesauce, and whisk until foamy*.
  4. Sift in flour, cocoa powder, sugar, baking soda, baking powder, and salt progressively while whisking or beating.
  5. Taste and add sugar as desired.
  6. Pour into prepared pan. Bake for 25-30 min.
  7. Let cool in pan for a few minutes, then remove and cool completely on a rack.
      * Mine didn't foam up, but still ended up fine.

     Assembly
  1. Cut the cake into 2 halves.
  2. Whip cream with desired amount of icing sugar.
  3. Drain cherries, and reserve some for the topping.
  4. In a small pot, mix remaining drained cherries, 1/4 cup of their juice, a sprinkling of sugar, to taste, and 2 tsp cornstarch. Heat until thickened, then cool completely.
  5. On the first layer of cake, spread an even amount of whipped cream. Add the cooled cherries.
  6. Delicately slide the 2nd layer of cake on top of the cherries layer.
  7. Spread with cream. 
  8. Place reserved cherries as desired.
  9. With a sharp knife or a vegetable peeler, shave some chocolate. Cover the rest of the surface with shaved chocolate.
  10. Cut and enjoy~

Monday, February 1, 2016

Lemon Sponge Cake with Cranberry Topping


I rarely start a post with a picture of the slice, but this time, the inside was what was important! For a dinner among friends, I tackled a recipe I found on Indian Kitchen, for an eggless lemon sponge cake. When the cake came out of the oven, I was surprised at how nicely spongy it was.


The yellowish color of the crumb comes simply from the lemon. When we ate it, however, we deemed the cake a little on the dry side. Maybe infusing it with some juice after baking, or baking it for a shorter time would have remedied that.


The topping is a sauce I made with rehydrated dried cranberries and candied orange peels that I had made a few weeks ago. I just stuck a couple handfuls of chopped dried cranberries and some candied orange peels in a pot with some water, and simmered it all until all the dried bits were rehydrated. Then I added a bit of a slurry of cornstarch to thicken it up. After cooling, I topped the cake with the mix.


RECIPE adapted from Indian Kitchen
  Ingredients
  • 1 3/4 cup flour
  • 1 tsp baking soda
  • 2 tsp baking powder
  • 1 1/3 cup yogurt
  • 2/3 cup powdered sugar
  • zest 1 lemon
  • 3 tbs lemon juice
  • 1/4 cup vegetable juice
  Procedure
  1. Preheat oven 180˚C.
  2. In a bowl, sift flour, baking soda, and baking powder.
  3. In a mixing bowl, whisk yogurt and powdered sugar.
  4. Add lemon juice and zest, and oil. Mix well.
  5. Add in sifted flour mix, and mix until combined.
  6. Pour into prepared pan and bake 20-30 min or until a toothpick comes out clean.
  7. Cool in the pan for about 2 mins.
  8. Unmold and cool on a cooling rack.
  9. Top and enjoy.

Lime and Lemon Shortbreads


The end of another short (and unofficial) internship meant another batch of cookies to deliver. I especially wanted to thank the doctor I was shadowing at the time, so I stamped a handful of these cookies with a "Thank You" message with a heart~

I was half tempted to make cranberry shortbreads again, but decided to opt for something different. Part of my motivation for this was that I did not want to deal with creaming butter and sugar. Therefore, I flipped through my "La Grande Imprimerie Gourmande" recipe book, which is full of various shortbread recipes, from the sweet to the savory.


I came across this citrus shortbread recipe that didn't seem like it would be too much trouble. In fact, the only problem was that there was no lemon or lime at home! A quick trip to the grocery store at the end of the road, and that was remedied with 4 untreated lemons and some limes.


I made a single batch of these, intending to make more. However, a shortage of time caught me, and I only managed the one. However, it was sufficient for the doctor and the nurses of the department. Unfortunately, one did not like lemon, so she did not eat any, but I could not have predicted that.


I made a small package with the portion for the doctor, and then put the rest in a small box to leave on the table of the nurses' room. Ingredients lists were stuck on, and a small blue flower.


RECIPE
  Ingredients
  • 1 small lemon
  • 1 lime
  • 200 g unsalted butter, softened
  • 300 g flour
  • 100 g powdered sugar
  • 1 pinch of salt
  Procedure
  1. Preheat oven 150˚C.
  2. Zest the lemon and the lime. Juice them in separate bowls.
  3. In a mixing bowl, mix the flour, sugar, salt, and zests.
  4. Add 1 tsp lime juice, and 1 tbs lemon juice, then the butter.
  5. Mix by hand until the dough comes together, without overmixing.
  6. Form a ball, and cover it in plastic wrap. Refrigerate 1 hour.
  7. Roll out dough on lightly floured surface to about 1 cm thickness.
  8. Cut out desired shapes, and bake for 20 minutes.
  9. Let cool and enjoy.

Wednesday, January 6, 2016

Pumpkin Cranberry Cupcakes


Even with the holiday season newly over, we were still receiving guests from time to time. This time, one of my indirect cousins came over to our house for an afternoon. For lunch, I made a pot of veggie spaghetti sauce, and my aunt helped me cook the spaghetti while I went and handled dessert. While we're on the topic of leftovers, I still had some ingredients left from the pumpkin cake roll. I still had about 3/4 of a cup of pumpkin puree left, along with half a jar of applesauce, and half a tub of cream cheese.


To make it manageable, I decided to make cupcakes. Due to shortage of time, I couldn't do very extended research, so settled for one of the first things I could find: a pumpkin muffin recipe from Vegan Richa.


As I did not have a full cup of pumpkin puree, I filled in the remaining volume with applesauce. In lieu of chocolate chips, I went for a handful of chopped dried cranberries. I did not want to deal with filling the inside with a cream cheese mix, so these were topped with cream cheese frosting. I wanted to play around a little with decorations, so went with a flower. The center is a trimmed dried cranberry. I used dairy milk this time because that was all I had. I also do not stock molasses, so I used some reduced sugar syrup I had.


RECIPE
  Ingredients
  • 1 1/3 cup flour
  • 1/2 cup icing sugar
  • 1/4 cup brown sugar
  • 2 tsp baking powder
  • 1/4 tsp baking soda
  • pinch of salt
  • 1 1/2 tsp cinnamon
  • 1/2 tsp ground ginger
  • 1/4 tsp nutmeg
  • 1 cup pureed pumpkin
  • 1/2 cup milk
  • 1/4 cup oil
  • 1 tbs molasses
  • 1 tsp vinegar
  • 1 handful dried cranberries
  Procedure
  1. Preheat oven 200˚C.
  2. In a bowl, mix all dry ingredients.
  3. Add in wet ingredients. Add in a tbs or 2 of milk as necessary.
  4. Fill cupcake pans 3/4 full.
  5. Bake for 15 min, then lower heat to 180˚C for another 5 mins.
  6. Cool, frost, and enjoy.

Saturday, December 26, 2015

Christmas '15: Pumpkin Yule Log Cake


Christmas desserts this year were split between my cousin B and myself. B made little choux and éclairs, and I dealt with the egg-free stuff for those among us that don't eat eggs. Having seen a recipe on Dash of (Vegan) Butter for a vegan pumpkin cream roll, and seeing how I still had a pumpkin sitting around, I jumped on the opportunity.

First, I roasted the pumpkin in the oven, puréed it in a food processor, then drained it in a colander with paper towels in the fridge to remove all excess moisture. Then I whipped up about 6 tbs of aquafaba (the liquid from a can of chickpeas), and proceeded with the rest of the recipe.


For the filling, I folded some whipped cream into the leftover cream cheese mix from the brownie topping. I also added a little more sugar. Then I cut a small section at the end to make a stump on top, which was glued on with more of the cream cheese mix.


The whole cake was covered with whipped cream that was mixed with chocolate powder. At first, I just dragged a fork over the whipped cream to make it seem like bark, but then opted instead to shave some chocolate off large choc chips (the only chocolate I had) to dust over the top.


In the end, the cake was well liked, but the cake batter was a little tough. Either I had overbaked it a bit, or the amount of dry ingredients should have been reduced.

PUMPKIN CAKE ROLL RECIPE
  Ingredients
  • 3/4 cup flour
  • 2 tsp cinnamon
  • 1 tsp baking powder
  • 1 tsp ground ginger
  • pinch of salt
  • 1/2 tsp ground nutmeg
  • 6 tbs aquafaba
  • 1/4 cup applesauce
  • 3/4 cup sugar
  • 2/3 cup puréed pumpkin
  • 1 tsp apple cider vinegar
  • icing sugar
  Procedure
  1. Preheat oven 180°C.
  2. In a bowl, combine dry ingredients. Set aside.
  3. Whip aquafaba on high until soft peaks. 
  4. On medium speed, add in applesauce, the progressively add sugar.
  5. Mix in pumpkin and vinegar.
  6. Fold in dry ingredients.
  7. Pour into a prepared pan, then bake for 15 min or until it springs back when lightly pressed.
  8. After removing from oven, immediately put on a clean dishtowel dusted with icing sugar.
  9. Roll it up with the towel and set to cool.
  10. Once cooled, unroll, fill with desired cream, and roll again.
  11. Ice as desired, and chill until eaten.

Mint Chocolate Cookies


December 15, 2015

As the end of the semester approached, I wanted to give little packs of cookies to my professors, as thanks for teaching. I also felt that some of them had been particularly helpful to me this semester.

I looked around in my stash of baking ingredients, to see what kinds of cookies I could make with what I had. I had thought about chocolate chip cookies, but I didn't have anymore choc chips... No more cranberries either, and at the time I was starting to dig in my boxes, I was not up for zesting a lime. Then I saw a box of mint-filled chocolates I had gotten before but that was just sitting there. I figured I could try and put that on or in a cookie somehow.


My first test attempt was a flop and almost left a chunk of charcoal at the bottom of the oven. The cookie had fallen through the grill despite the baking paper (I neglected to put a pan between the paper and the grill), and had spread like crazy. Some flour and chilling later, I finally managed to get something decent.

The mint chocolates were cut into small rectangles/triangles depending on the part of the chocolate. I then stabbed them through the top of each cookie formed. Some pieces melted and caramelized on the sides of the cookies.  It might have been better if I had just stuck a bigger slab in the middle of each cookie, but I settled with what was done.

RECIPE
  Ingredients
  • 1 1/2 cup butter, softened
  • 1/2 cup golden sugar
  • 1 cup brown sugar
  • 1/2 tsp salt
  • 2 tsp Orgran egg replacer
  • 4 tbs water
  • 3 cups flour
  • 1 tsp baking soda
  • 2 tsp hot water
  • mint chocolate (or sub in 1 cup chocolate chips)
  Procedure
  1. Preheat oven 175°C.
  2. Cream butter and all sugar until fluffy.
  3. Mix the egg replacer and the 4 tbs water (proportions ~2 eggs) and beat them into the mixture.
  4. Dissolve baking soda into the hot water before adding.
  5. Stir in flour and chocolate chips.
  6. Put on baking sheet by large spoonfuls.
  7. Bake for 10-15 mins.

Homemade Gyoza (Potstickers)


Whew, lots of December things to catch up on here on the blog! Despite a crazy few weeks of exams and papers and presentations, I still managed to squeeze in some baking to get rid of some stress.

December 11, 2015

For a long time now, I've been wanting to make my own gyoza (Japanese potstickers), as they are a little hard to find in my corner of the world when I am at college. I found the gyoza skin recipe on La Fuji Mama and had it bookmarked for about a year before I finally got to it and made these.


First I made a pan of filling. To keep it relatively simple, I just stir-fried chopped Chinese cabbage, shiitake mushroom (dried and rehydrated), carrots, and ginger, which I seasoned with vegetarian oyster sauce. On hindsight, adding something to try and make it hold together more easily would have made wrapping the gyoza easier, but I was out of tofu and patience.

Then I made the skins, and rolled them out flat. As I am not proficient at making nice circles with just the rolling pin, I cheated by using a circle cutter to cut them out with.


Everything was kept under a wet towel while L and I wrapped them (she helped me to speed up the process). I think we made about 33 of them, though the dough was a bit too thickly rolled, and the thicknesses were uneven.


Then L helped me fry them on a nonstick pan until the bottom was nicely browned, before adding hot water to the pan and covering it, to steam the tops of the gyoza.


We ate these dipped in a mix of veg ponzu sauce (mix of soy sauce and citrus) and chili.

GYOZA SKIN RECIPE
  Ingredients
  • 2 cups all-purpose flour
  • 1/4 tsp salt
  • 1/2 cup boiling water
  • flour for dusting
  Procedure
  1. In a bowl, mix flour and salt. Make a well in the middle.
  2. With chopsticks or another utensil, add hot water in the well and mix in flour progressively until a dough is formed.
  3. Roll into a ball. Some more water may be required.
  4. Cover with a damp cloth and let site for 1 hour.
  5. Knead on a floured surface for about 5 mins.
  6. Form into a log and cut into about 40 slices.
  7. Roll into round skins (or use round cookie cutter to make circles), dusting both sides with flour.
  8. Fill and cook, or wrap in plastic wrap and refrigerate until use.

Sunday, December 6, 2015

Lime Glazed Cranberry Shortbread Cookies


Remember these cranberry shortbread cookies I made last summer? Well I made them again, this time for a friend's birthday gift. I wasn't really up for rolling out the dough, however, so the dough was rolled into a log, then refrigerated. I then sliced the log into fairly irregular (I don't have much experience in cooking log cutting) slices, then baked them. Since I only made half a batch, my log was short enough that I could wrap it in cling film, and tie one end to the rack in the fridge, so that the surfaces didn't leave any flat side to my log.


Just like for the oatmeal cookies, I soaked the dried up cranberries in a bit of hot water before chopping them and throwing them into the mix. Instead of leaving them plain, I made a quick glaze with some icing sugar and lime juice, which I spread on half of the top surface of each cookie. The recipe for this glaze was from Cakecrumbs. The cookie recipe can be found in the link above.


LIME GLAZE
  Ingredients
  • 1 cup icing sugar
  • 1 tbs lime juice
  Procedure
  1. Mix together sugar and lime into a paste in a heat-proof bowl.
  2. Set the bowl into a pot of simmering water and heat until mix is runny.
  3. Glaze cookies, and let dry.

Wednesday, December 2, 2015

Cranberry Oatmeal Cookies


With all the academic deadlines flying around at this time of the semester, I needed to get rid of some stress. I had pulled an all-nighter the night before, and was trying to stay awake long enough to go to bed at a reasonably normal time.

I gave in to the temptation that had been gnawing at me for the past few days, but that I had to push away due to the aforementioned deadlines: BAKING.


Trying to think of what I wanted to make, I remembered the last of the dried cranberries sitting in one of the kitchen drawers. I used some for other cookies I will post in a few days, that I plan to give to a friend for her birthday. Then my cousin L (who is also my roommate) complained that I hadn't made normal cookies in a while for her to eat. I think she actually had chocolate chip in mind, but my stash of chocolate chips is long gone. I hit up Google, and came up with these cranberry oatmeal cookies.


The recipe is from Eggless Cooking, and makes more than the pictured 20 as plenty disappeared into L's stomach as I baked tiny batch after tiny batch of 6-7 in our tiny oven. The pack of cranberries had somehow ripped at some point, and wasn't closed properly, so the cranberries were dried up. I attempted to slightly rehydrate them in hot water before using them. I also subbed walnuts for the pecans.

RECIPE
  Ingredients
  • 3/4 cup (70 g) butter, softened; margarine makes this vegan
  • 1/4 cup cane sugar
  • 3/4 cup brown sugar
  • vanilla or 1 packet vanilla sugar
  • 1/2 cup non-dairy milk
  • 1 cup flour
  • 1/2 tsp baking soda
  • 1/2 tsp cinnamon, 1 pinch nutmeg
  • 3 cups quick cooking oats
  • 1 cup cranberries
  • 1 cup walnuts (optional)
  Procedure
  1. Preheat oven at 180°C.
  2. Cream sugars and butter until well combined.
  3. Add in milk, and mix.
  4. In a bowl, mix spices, flour, and baking soda. Add to the butter mix.
  5. Fold in oats, cranberries, and pecans.
  6. Spoon tablespoons of mix onto a lined baking tray. Flatten with a fork.
  7. Bake for 12-15 minutes.

Saturday, November 21, 2015

Vegan Banana Crêpes


After making the banana brownie, I still had 2 bananas left. I still wasn't up for banana bread, so I thought I would try making vegan crêpes with them. I found a recipe online, and thought I would give it a try. The weekend arriving was a perfect opportunity.


For a Saturday brunch, I whipped up this recipe of banana crêpes, and we enjoyed it with some leftover dulce de leche one of my cousins had given me. Then for more a more savory version, my cousin L shaved some cheese off a block we have, and rolled it in.


RECIPE
  Ingredients (makes about 12)
  • 250 g flour
  • 2 bananas
  • 500 mL non-dairy milk (I used hazelnut milk)
  • pinch of salt
  • pinch of baking powder
  • small spoon of sugar (optional)
  Procedure
  1. In a blender, blend sliced bananas and 100 mL milk.
  2. Mix to the rest of the milk.
  3. In a mixing bowl, combine dry ingredients.
  4. Slowly mix in the milk/banana mix, taking care to avoid making lumps.
  5. If too thick (which it was in my case), add more milk until it reaches desired consistency
  6. Cook a ladle-full or two at a time in an oiled pan on medium-high heat, flipping to cook both sides.
  7. Enjoy with topping of choice.

Sunday, October 25, 2015

Chocolate Checkerboard Cake with Strawberries


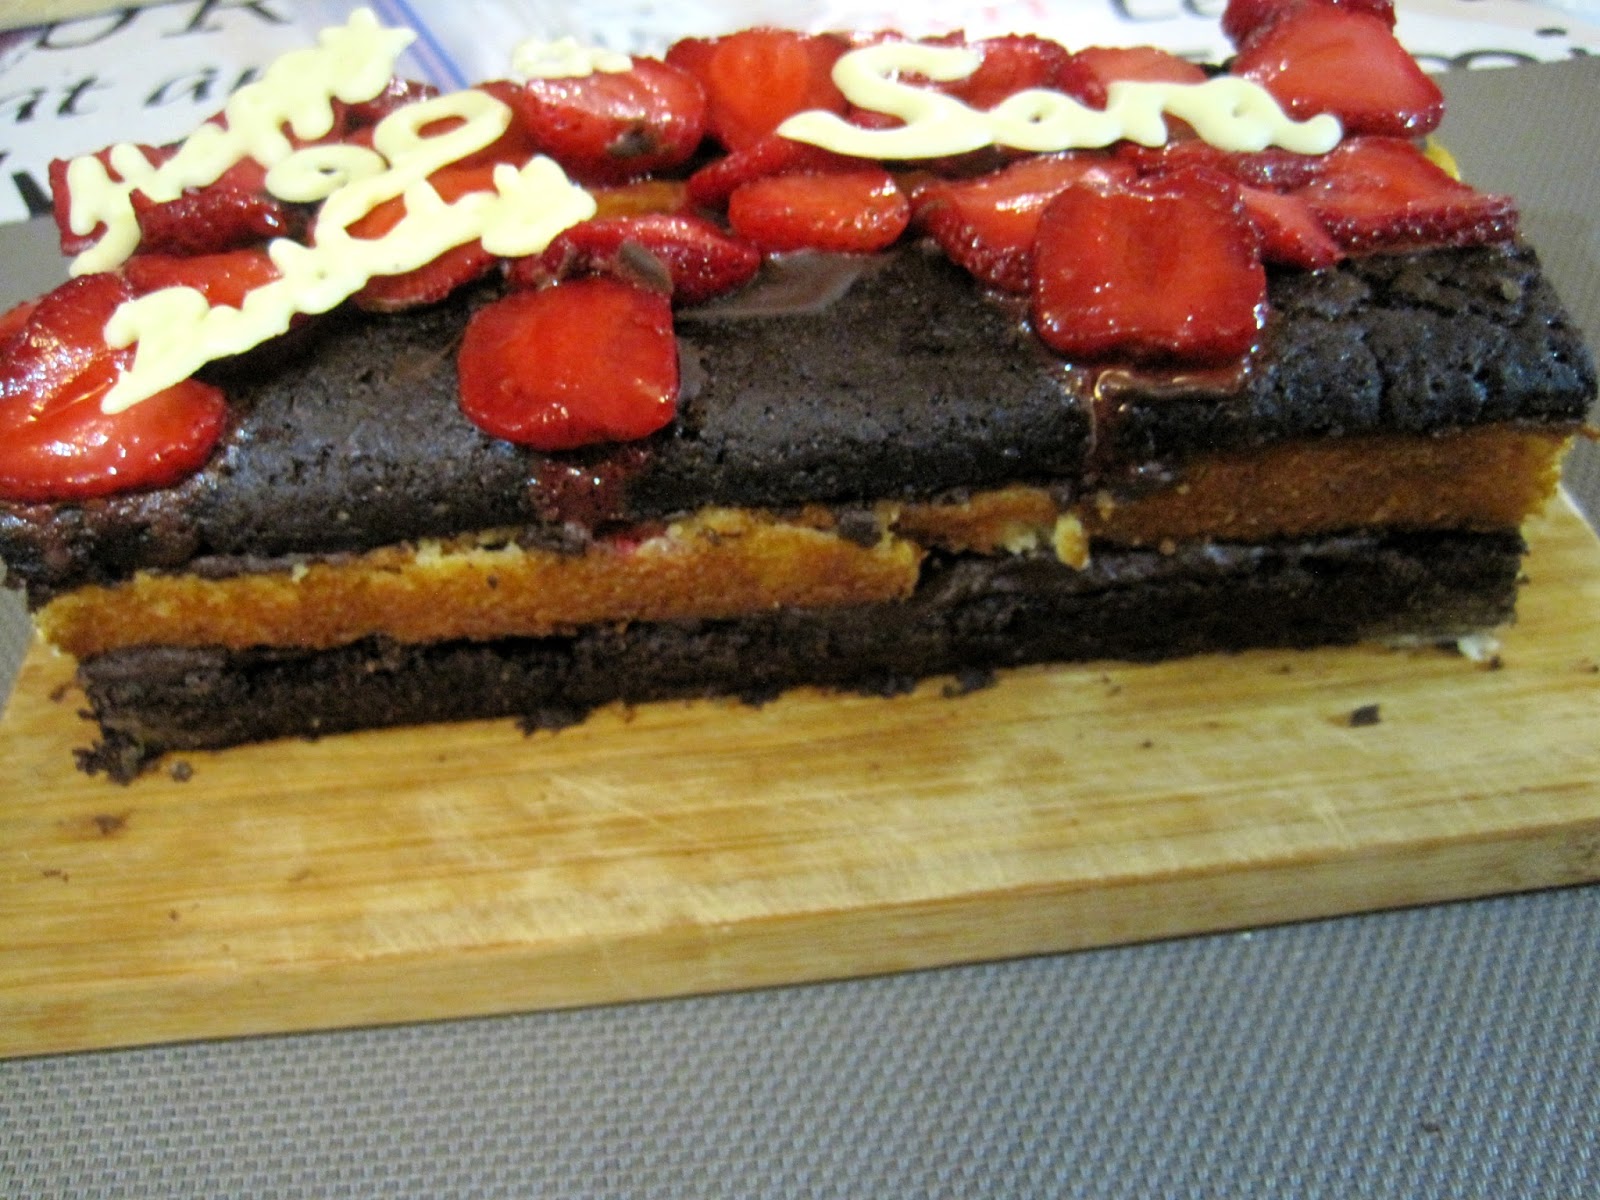
Last Monday was one of my friends' birthday. Unfortunately, this last week was also one of the busiest weeks of the semester, being midterms time. Due to this quite pressing engagement, we couldn't really celebrate. My cousin and I thought we should do something at least, however, as we are usually on Fall break when her birthday comes around. This year, however, our semester somehow got moved up a week, so we are actually on campus on her birthday.


I know that she likes chocolate. Instead of doing boring plain chocolate cake, however, I thought I'd alternate dark and white chocolate in a checkerboard cake. I decided to stick to two mudcake recipes (like the ones I used in the Christmas tree cake) but ended up with a bit less white chocolate mudcake than dark. I thus had to chop some off in order to make it somewhat equal. I thought I'd just chop off the top, domed part, and just stick a layer of white and a layer of dark, and invert 1/3 of that for a 2-layer cake.

As you can see, however, I ended up including the domed parts, cut into strips, for a third, somewhat smaller layer. I just didn't want the cake to be too flat... The strips of cake were attached together with a dark chocolate ganache.


I thawed some frozen strawberries (fresh ones being a bit too pricey now for my student wallet), drained them, and sliced them. I "glued" them over the seams on the top with some melted dark chocolate, then I arranged whatever leftover I had a bit around. These provided a nice refreshing touch to counter the sweetness of the chocolate. For contrast, I added words of white chocolate that I wrote on a small piece of baking paper and stuck in the freezer to set.


The two cakes should probably have been refrigerated before I cut them, as they somewhat crumbled when I tried arranging them right after they just cooled to room temperature. In the end, after the ganache and the cooling in the fridge, they stayed together nicely.


RECIPE
  Ingredients

     Dark Chocolate Mudcake
  • 1 1/4 cup flour
  • 1 cup sugar
  • 1/3 cup unsweetened cocoa powder
  • 1/2 tsp salt
  • 1 tsp baking soda
  • 1/3 cup vegetable oil
  • 1 cup tepid water
  • 1 tsp vinegar
  • 1 tsp vanilla extract
     White Chocolate Mudcake
  • 1 cup sifted flour
  • 2 tsp baking powder
  • pinch of salt
  • 1/4 cup sugar
  • 3/4 cup soymilk or other milk
  • 1/4 cup oil
  • 1 tsp vanilla extract
  • 1/2 tbs vinegar
  • 100 g white chocolate, melted
     Chocolate Ganache
  • 150 g chocolate, chopped
  • 75 mL (~1/3 cup) heavy cream
  Procedure

     Dark Chocolate Mudcake
  1. Preheat oven at 180°C. Grease and line a loaf pan.
  2. Sift together all dry ingredients. In a separate bowl, mix together wet ingredients.
  3. Make a well in the dry ingredients, and pour in the wet ingredients. Mix well
  4. Pour into the pan, and tap the pan against the table/working surface to release trapped bubbles.
  5. Bake 30-35 minutes or until well risen and a toothpick inserted in the middle comes out dry.
  6. Leave to cool in the tin for 20 mins, then remove to cool completely.
     White Chocolate Mudcake
  1. Preheat oven at 180°C. Grease and line a loaf pan.
  2. In a large bowl, mix the dry ingredients.
  3. Melt the chocolate.
  4. Add the soymilk, oil, chocolate, and vinegar to the dry ingredients mix.
  5. Mix until smooth.
  6. Pour into the pan, and tap it against the table or working surface to release trapped bubbles.
  7. Bake for 20-30 mins.
  8. Cool.
     Chocolate Ganache
  1.  Place the chocolate in a medium bowl.
  2. Heat cream until boiling.
  3. Pour cream over chocolate, and mix until all chocolate is melted.
     Assembly
  1. Cut the two cakes into even layers. Spread ganache on one of the layers, then top it with a layer of the other one. Repeat if there is sufficient cake remaining.
  2. Cut the assembly into 3, lengthwise.
  3. On a surface, set down the edge piece. Spread some ganache on the inside-facing side of it.
  4. Turn the middle row upside down, then set it next to the edge piece, pressing slightly for it to adhere.
  5. Spread more ganache on the bare side of the middle piece, and add the remaining edge piece.
  6. If desired, cover the whole cake in ganache or other icing.
  7. Refrigerate before serving.
      Tips

    • Ideally, the recipe quantities should be tweaked to make 2 cakes of equal height. In that case, 2 cakes of opposing patterns can be made.
    • Refrigerating the cakes before cutting them will make them a bit firmer and thus less likely to crumble.
    • If there are remaining cut-offs of the cakes (like from the domes), they can be made into cake pops.
    • Other cakes and flavors or icings can be used to make such a cake.
    • Using vegan chocolate and non-dairy cream will make this cake vegan.

      Sunday, September 13, 2015

      Carrot Cake


      Phew, finally caught up on the backlog! Here is what I baked yesterday: Carrot cake!

      The main reason for this was because I had carrots laying around. The other reasons include, but are not limited to: I needed to de-stress, I have never made this before, and "why not?"


      The process to make the batter reminded me a lot of banana bread, except that I had grate the carrots instead of simply mashing my bananas. The ingredients used are similar, although I haven't really gone to see if the proportions are the same. Probably not, since bananas have a higher water content than do carrots.


      I adapted a recipe from Spice Up The Curry, although I changed some things according to personal preferences, such as cutting down the sugar and changing some sugar types. I made 2 small, pretty tall cakes instead of a larger, flatter one, though to be honest, I did not think it would rise that much even with the amount of leavening agents involved.


      The cake was frosted with an improvised cream cheese frosting, namely cream cheese, powdered sugar, and lime. The amounts? I kind of ad-libbed. I put some cream cheese in. Then I squeezed a small section of a lime in, tasted it... "Not sour enough." After a couple more times, it had enough of the citrus zing to it to match my imagined taste, but then I only had a small piece of lime left. "Oh well" preceded my squeezing of the rest of it in. Then I added a little bit more cream cheese because it had gotten pretty watery by then. Powdered/icing sugar was added to round off the sourness, then the whole bowl took an overnight nap in the fridge just because we were too full to eat last night, and I was not going to frost it ahead of time.


      For extra texture, I put some crushed walnuts over the top, and gave it all a bit of color with a dusting of cinnamon. This cake was nice and moist, which was very pleasant to eat.


      CARROT CAKE RECIPE
        Ingredients
      • 1 1/2 cup flour
      • 1 tsp baking powder
      • 1 tsp baking soda
      • 2 pinches salt
      • 1 tsp cinnamon
      • 1/4 tsp nutmeg
      • 1/4 cup + 2 tbs neutral oil
      • 1/4 cup golden sugar
      • 1/4 cup dark brown sugar
      • 1/4 cup soymilk
      • 1/4 cup water
      • 1 cup grated carrots
        Procedure
      1. Preheat oven 180°C.
      2. In a bowl, mix flour, baking powder, baking soda, salt, cinnamon, and nutmeg. Whisk well.
      3. In a mixing bowl, whisk sugars and oil. Add in soymilk and water and whisk well.
      4. Add in the flour mix in 2 times, mixing well each time.
      5. Fold in the carrots.
      6. Pour into a prepared pan, and bake for 25-30 minutes, or until a toothpick inserted comes out clean.

      Homemade Pizza


      August 1, 2015

      This was my last day in China. My cousin's and my flights were scheduled for late in the evening, so I had time to try a couple more recipes. I had been getting a bit discouraged by the heat's effects on some of my recipes (I will not even blog about the completely failed puff pastry I attempted), but I thought I might as well give it a bit more of a try.


      So I decided to try making this pizza recipe that a family friend had sent me a while ago. It's not one where the dough can be spread very thinly, but it was good! The only thing is that I would finish the cooking in a pan to crisp the bottom of the crust some more. This was topped with tomato sauce, olives, mushrooms, tomatoes, and grated mozzarella cheese.

      PIZZA DOUGH RECIPE
        Ingredients
      • 250 g flour
      • 1/2 tsp salt
      • 1/2 tsp yeast
      • 3 tbs olive oil
      • 200 mL cold water
      • 1/2 tsp sugar
        Procedure
      1. In a large mixing bowl, mix flour, salt, and yeast.
      2. Add olive oil, water, and sugar, and mix with a fork.
      3. If necessary, add flour or water depending on texture.
      4. Knead dough for at least 5 mins.
      5. Make a ball and put in an oiled bowl. Brush the top with some more oil.
      6. Cover the bowl with plastic wrap, and refrigerate overnight.
      7. Take the dough out at least 2 hours before use. Knead a few seconds
      8. Make a ball again, put on an oiled and floured baking sheet, and spread by hand.
      9. Top with topping of choice.
      10. Bake 20 mins in an oven preheated at 220°C.
      11. Crisp the bottom in a pan heated on the stove.