Sunday, August 10, 2014

Homemade Plum Jam


Did I mention having a lot of plums from my uncle's garden? Well, when we still had to finish the container of plums that was sitting in the fridge, a relative brought yet another bucket of them. So together with my mom, we decided to make jam out of them in order to keep wastage to a minimum.

My mom was the one who started the process, so I can't tell you just how much sugar she put. Most sites seem to recommend putting 1:1 ration of fruits to sugar in weight. I think that may be excessive, and depends on how ripe the fruits are.

I had cut about half the plums in half to remove the pit, but my mom threw the rest into the pot whole, which I don't recommend (unless the pits are very very hard to remove). As we cooked, I had to find and remove every pit that came loose from the flesh, which was not a fun job, especially since they stopped floating once the jam began thickening.

Near the beginning, once the juice started boiling, I threw in a small amount of butter, which makes the jam richer, and also prevents foaming. The rest of the process is just simmering the fruits until thickened and set.

I then sterilized the jars in boiling water, lids included (they were old jam jars from some jams we had bought at the supermarket, hence the "fraise (strawberry)" label on the right jar). Putting the jam in hot, then closing it to ensure that no bacteria sneaked their way in. Once the jars cooled, I stuck on my homemade labels, which say "Plum Jam, August 3, 2014."


Vegan Flan/Crème Brulée


In my plum tart post, I mentioned a vegan custard recipe, which I used as a base for the fruits on the tart. I had put the leftover custard into small oven dishes and filmed them to prevent the formation of a weird skin.


I then put a layer of brown sugar on top and broiled them in the oven until melted and slightly toffee-like.


Unfortunately, either because I took too long between the making of the custard and the caramelizing/toffee-ing, or because of the reheating and re-cooling, the texture of the custard wasn't the smooth creaminess I found in the tart base. The flavor, however, was wonderful, especially with the melted brown sugar that became both a small film of crunchiness and a delicious caramel sauce. This will be something to try again, maybe with tweaks to the recipe.

Rest assured, the recipe was fine in the tart~

VEGAN CUSTARD RECIPE
  Ingredients
  • 500 mL milk of choice (I used unsweetened soymilk)
  • 2 tbs honey/syrup/unrefined sugar
  • 2 tsp vanilla extract
  • 2 tbs cornstarch (which I didn't have so I subbed with 6 tbs wheat flour)
  Procedure
  1. Mix milk, sweetener, and vanilla in a pot and heat until almost boiling.
  2. Make a slurry out of starch and a bit of water, and add to the pot, stirring.
  3. Simmer until thickened.
  4. Consume as fast as possible.

Plum Pockets


After having used about half of our stash of plums from my uncle's garden, I had some more to use up. I found some old pastry dough squares laying about in the freezer, so I thawed them and made some pockets.


I brushed the dough with melted butter, filled it with cut and sweetened plums, and stuck the whole thing in the oven.


Unfortunately, the plums leaked A LOT of juice, and I had soggy bottoms... But they were still yummy enough nevertheless~

Saturday, August 2, 2014

Vegan Plum Tart


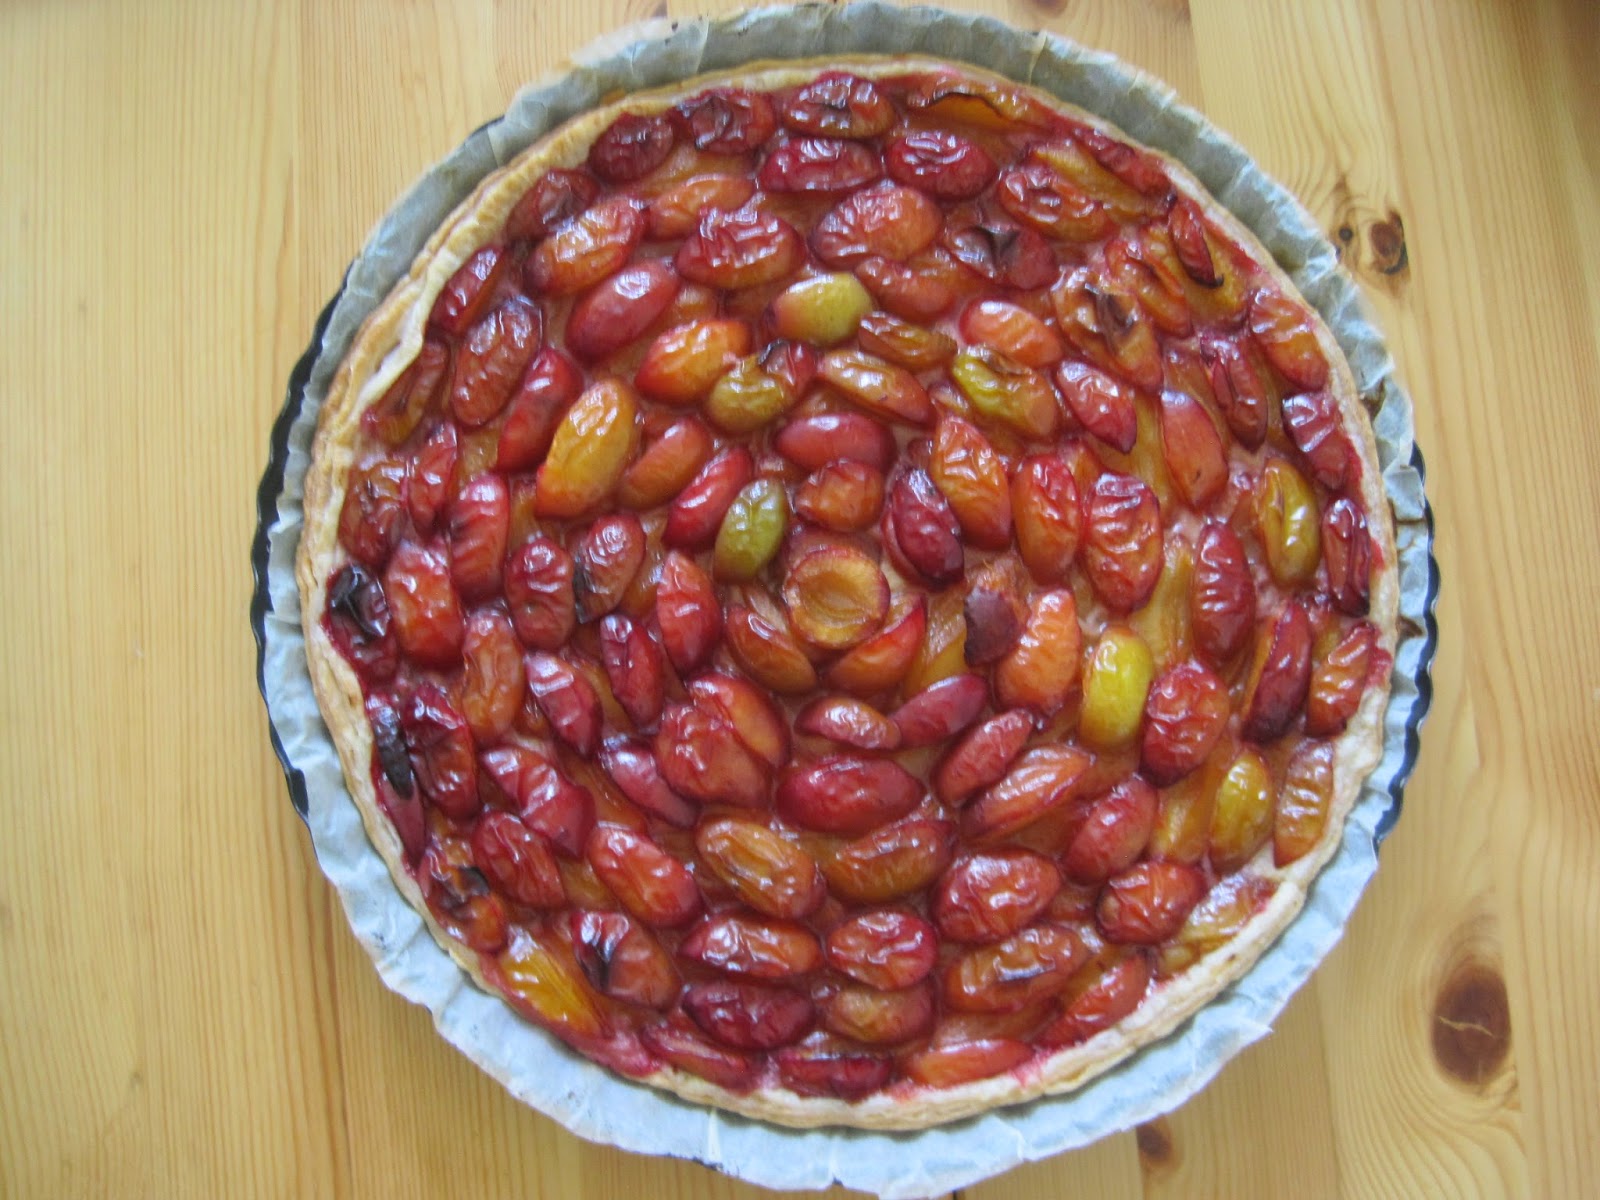
My mom wanted to have a get-together with some people. At first, she asked me to make some pasta, but then, since she was going to make another main dish to bring along, she said I could make dessert. My dad chipped in that we had a box full of organic plums from my uncle's garden that was sitting in the fridge. So plum tart it was.


This being my first time making tart with fruit other than apple, I did a quick Google search. It would seem that plums are often paired with an almond paste thing, which I was not ready to deal with. So I decided to incorporate a couple of ideas from a few sites, and some of my own ideas into this tart.


First, I gathered ingredients. Due to time constraints, I used store-bought pastry dough, which contained margarine instead of the customary butter. I used the plums, and a homemade vegan custard, the recipe of which I will provide in another post in a few days.


To prepare the plums, I cut each in 4, and sprinkled the whole thing in sugar. I let that sit, mixing occasionally, while I pre-baked the crust and made my custard. Then, I simply drained the plum pieces using a large strainer, and keeping the liquid for later.


I spread a thin layer of custard on the crust, and let it cool a bit so it could set. Then I first made concentric circles of plums, skin-side down. I went back around and filled the gaps between the circles with another layer of plum pieces, this time skin-side up.


Baked for 30 mins at 200°C. The plums shrank a little in the oven.


After letting it cool, I nuked some of the drained plum juice with some sugar in the microwave to make a glaze, which I went and brushed on the plum pieces using a spoon. 


As you can probably tell, I'm playing around with my post format. If you would be so kind, please let me know in the comments what you think about it~

Thursday, July 24, 2014

Almond Butter Cookies Topped With Blueberry Jam


I have been interning at a molecular biology lab for the past couple of weeks. The person I follow around the most is on vacation starting tomorrow, so I figured I should bring something for everyone today. Something homemade, of course.

I guess the urge also came from not baking for a long time.

I decided to make these almond butter cookies I have made a few times before, mostly from leftovers of cheesecake crust dough. As I mentioned in the first time, the recipe was originally for cookies. They are often well-liked by people who eat them, and don't require too much fuss to make.


Being at the lab full-time doesn't give me a lot of time, though. So I prepped the dough on Tuesday night, and baked it last night. Due to ingredient shortage, I ended up using salted butter instead of unsalted, and used less than the recipe called for... which explains the few cracks in the cookies, as they didn't hold together as well. I used more sugar, too, to balance out the salty flavor that came in from the butter.

I baked each tray of cookies (at 20 cookies a tray) for 5 minutes, then topped the indents I made with jam for the last 15 minutes of baking. This keeps the jam from becoming too candy-like.


I also made a little "card" with the ingredients list, in case someone at the lab was allergic to something. This gave me an opportunity to dive into my card-making materials box. I wrapped it up in some Saran wrap before putting it in the bag with the cookies, to keep it from becoming oily.


RECIPE (with reduced butter and added sugar)
  Ingredients
  • 400 g flour
  • 200 g almond powder
  • 330 g salted butter
  • 150 g sugar
  • blueberry jam, as desired
  Procedure
  1. Take butter out of the fridge.
  2. Preheat oven at 180°C.
  3. In a large bowl, mix all the dry ingredients.
  4. Add small pieces of butter and rub into the flour mixture until no butter remains on its own. Try to not work the dough too much.
  5. Roll the dough into logs and refrigerate around 30 mins.
  6. Cut the logs into desired, even pieces. (I had to reshape them because my logs were uneven.)
  7. Using your thumb, make indents in the cookies.
  8. Bake for 5 mins in the middle of the oven, then put jam into the indents. Bake for another 15 mins.
  9. Let cool completely.

Saturday, June 14, 2014

Egg-free Berry Tiramisu with Génoise Sponge


We celebrated a late Fathers' Day (it was on the 8th, here in Belgium) yesterday, since my brother could not make it on the actual day. Due to the hot weather lately, I felt we needed something refreshing for dessert.

I settled for a tiramisu with homemade sponge. I used this recipe as a base for the egg-free génoise sponge cake, but subbed some vanilla extract instead of using strawberry flavor. I was also out if oil, so I melted some butter and used that instead.


I baked it flat, because I intended to cut strips out of it to roll into spirals to fit into the glasses. That originally beautiful plan fell through as the cake just broke while I was trying to roll it. Too bad. I then went and ripped it into little squares and soaked them in some mint tea I had made by steeping mint leaves from the garden in some hot water.


All this time, I was busy defrosting my frozen mixed berries (raspberries, currants, blackcurrants, blueberries, strawberries).


Then I beat some whipping cream into soft peaks, and mixed in some ricotta and some sugar.


Time to layer everything~ I put tea-soaked sponge in the glasses (I made 10 of them), followed by a layer of cream mix, topped with spoonfuls of berries. Then I repeated these steps, and used the last layer of berries to decorate.


I originally wanted to try and make hearts out of the round berries (currants, blackcurrants, blueberries), but it turned kind of messy, especially with the juice flowing everywhere. So I settled for a standing raspberry and a carpet of other berries. Due to the lack of color contrast, I decided to add a few mint leaves on top.


The effect would have been even better if there hadn't been juice flowing everywhere, but by that time, I was too dead tired to try and really drain every spoonful of berries.


EGGLESS GENOISE SPONGE RECIPE
  Ingredients
  • 1 cup (245 g) yogurt
  • 1/2 tsp baking powder
  • 1/2 tsp baking soda
  • 1/2 cup (111 g) oil
  • 1/2 up (100 g) sugar
  • flavor
  Procedure
  1. Preheat oven at 200°C for 10 mins.
  2. Sieve flour twice (I went for 4 times) then set aside.
  3. Cream yogurt and sugar until sugar has completely dissolved. Add baking soda and baking powder, and whisk/beat for 2 mins. Leave aside for another 5 mins until bubbles have formed.
  4. Add oil and flavor. Then add in flour little by little and beat until smooth.
  5. Bake at 200°C for 10 mins, then reduce heat to 180°C and abake for 30-35 mins.

Apple Cake with Whipped Cream and Caramel


On a weekend with guests over, my brother made some homemade pizza while I made a cake. I originally intended to make jam-topped almond butter cookies, but due to time constraints, I settled for egg-free cake with diced apple inside.


Turns out after I baked it and decorated it with whipped cream and caramel sauce (caramel always fails with me...), the inside was not cooked enough. So I had to scrape off the cream and re-bake the cake some more... Just goes to show that I have a lot of failures as an amateur baker...


I also accidentally left all my baking decoration tools at my dorm, so I had to make do with a plastic bag to try and pipe designs on top. As usual, when I use a plastic bag, I cut the hole too large, so it makes for sloppy decorations.

All in all, this cake was a pretty bad failure, though the end result was tasty enough.

Thursday, June 5, 2014

Apple Topped Spiced Cake


While planning to visit yet another family friend, my mom said something about buying a tart or cake to bring along. Personally, I felt it was unfair that one family friend got homemade goodies, while another one would get store-bought. So I decided to whip up a quick cake.

The recipe for the cake itself is the same as this one, but without the fruits, and with more milk and oil (215 g and 111 g respectively). I topped it with hand-whipped whipped cream (whipping cream and some icing sugar).


I cooked apple slices (thicker than the ones I use for apple tarts) in some brown sugar syrup, before laying them on top of the whipped cream. Then I dusted the whole thing in cinnamon, and glazed the apples with a bit of leftover apple glaze that I had from one of the last times I made apple tarts, which I flavored with a dash of rosewater.


Tuesday, June 3, 2014

Cake Pops and Apple Tartlets

I went to visit some family friends with my mom yesterday, and she insisted I bake something as a gift to bring along. My mom's strongly suggested apple tarts (seems it's her favorite dessert out of my whole repertoire...), but I've been baking only that since summer break started, so I wanted to make something else.


I settled for cake pops. My mom dug out some old, wrinkled apples, so I thought I'd try and use those up. I used my handy vegan cake recipe, adjusted a bit for the use of grated apples and a small handful of wild strawberries picked from the garden (the cake itself isn't vegan this time around because I didn't have any non-dairy milk and had to use cow milk).


After the cake cooled, it was a simple matter of breaking it into pieces to blend into crumbs, add in enough homemade applesauce (cooked, grated apple) for it to hold together well, and making spheres out of the batter. I made them roughly 1.5 tablespoons per cake pop. After refrigerating the spheres for a while, I dipped toothpicks in chocolate before poking them into the cake spheres. Back in the fridge, then coating the whole thing in melted chocolate and sprinkling toasted, crushed almond slivers.

After tasting one, my mom still wanted apple tarts, so I worked at them after dinner last night. (Seems I always do apple tarts and cake pops together...). Good thing I still had crust dough I had prepared last time in the freezer.


The apple variety I was using was not very good for this... After microwaving the apple slices (see tutorial), they would stiffen again once cooled. So instead of microwaving the life out of these apple slices, I boiled them in a brown sugar syrup.


Because I felt that the syrup gave the apples enough sweetness already, I opted for not glazing them. They look less shiny, of course, but I can guarantee the flavor's right.


And since I still had leftover cake crumbs and applesauce, I made spheres out of them last night, and left them in the fridge overnight. Earlier, I got them out, stuck toothpicks in them, and I just finished coating them in chocolate and their sprinkling of almonds. I left them on a silicone baking mat wrapped around the flat, round part of my springform pan.


Since I had just finished coating them right before I took pictures, some of the chocolate coatings are not set yet, but they will soon be.

I stupidly left my cup measuring spoon things at my college dorm, so I had to do things by weight. Here's the amounts I used for this spiced and fruity version of the cake used.

SPICED and FRUITY CAKE RECIPE
  Ingredients
  • 218 g flour
  • 125 g brown sugar
  • 1 tsp baking powder
  • 1 tsp baking soda
  • 1 pinch of salt
  • cinnamon, as much as desired
  • 200 g milk
  • 55 g neutral oil
  • 117 g grated/mashed apples and strawberries
  • 1 tbs while vinegar
  Procedure
  1. Preheat oven 180°C
  2. In a large bowl, whisk together all dry ingredients.
  3. In a medium bowl, whisk wet ingredients (including fruits).
  4. Add wet to dry ingredients, mix until combined.
  5. Pour into prepared pan, bake for around 25 mins or until a toothpick comes out clean.

More Mini Apple Tarts

At my mom's request, I made more of these mini apple tarts.


Picture taken hastily before everyone started nomming on them. I used the opportunity to make a double batch of dough (I use 1/2 of a batch per batch of mini tartlets), so I can freeze some for next time.