Saturday, November 21, 2015

Vegan Banana Crêpes


After making the banana brownie, I still had 2 bananas left. I still wasn't up for banana bread, so I thought I would try making vegan crêpes with them. I found a recipe online, and thought I would give it a try. The weekend arriving was a perfect opportunity.


For a Saturday brunch, I whipped up this recipe of banana crêpes, and we enjoyed it with some leftover dulce de leche one of my cousins had given me. Then for more a more savory version, my cousin L shaved some cheese off a block we have, and rolled it in.


RECIPE
  Ingredients (makes about 12)
  • 250 g flour
  • 2 bananas
  • 500 mL non-dairy milk (I used hazelnut milk)
  • pinch of salt
  • pinch of baking powder
  • small spoon of sugar (optional)
  Procedure
  1. In a blender, blend sliced bananas and 100 mL milk.
  2. Mix to the rest of the milk.
  3. In a mixing bowl, combine dry ingredients.
  4. Slowly mix in the milk/banana mix, taking care to avoid making lumps.
  5. If too thick (which it was in my case), add more milk until it reaches desired consistency
  6. Cook a ladle-full or two at a time in an oiled pan on medium-high heat, flipping to cook both sides.
  7. Enjoy with topping of choice.

Banana Brownie


For a hallway dinner, I figured I should try and do something with the bananas I had left in the fruit basket. I wasn't really in the mood for banana bread, though, so I thought I would try and tweak my brownie recipe into one that would incorporate bananas.

I used mashed bananas instead of the applesauce, and added whatever chocolate I had left in my baking ingredients storage (which turned out to be mostly dark chocolate, with a small bit of white chocolate chips).

Dipping the bottom of the 12 banana slices in some flour kept them from sinking during the baking process. I also sprinkled some granulated cane sugar on top of the slices so that they would caramelize a bit, as well as to keep them from drying out.

RECIPE
  Ingredients (for a loaf pan)
  • 3/4 cup (94 g) flour
  • 1/4 tsp baking soda
  • 1 tsp baking powder
  • pinch of salt
  • less than 1/4 cup (~30 g) cane sugar
  • 1 1/2 (~70 g) mashed banana
  • 1 packet vanilla sugar
  • 3 tbs hot water
  • pinch of instant decaf/coffee
  • 200 g chocolate
  • 3 tbs (28 g) butter
  • 1/2 banana, for topping
  Procedure
  1. Preheat oven 180°C. 
  2. Oil and flour a loaf pan.
  3. Mix flour, baking powder, baking soda, and salt together in a bowl, and set aside.
  4. In a microwaveable bowl, put chopped chocolate and butter. Melt 30 seconds at a time in a microwave until the chocolate appears partly melted. Stir until smooth.
  5. In a large mixing bowl, whisk mashed banana, vanilla sugar, and sugar until melted.
  6. Add hot water and instant decaf/coffee.
  7. Add in the melted chocolate and mix well.
  8. Fold in the dry ingredients.
  9. Pour into pan. Slice the half banana, and dip one side in some flour before putting on top of the batter. Sprinkle some sugar on top of each slice.
  10. Bake for 25-30 minutes or until a toothpick comes out dry.
  11. Cool and enjoy with some ice cream or whipped cream (or both)~

Sunday, October 25, 2015

Chocolate Checkerboard Cake with Strawberries


Last Monday was one of my friends' birthday. Unfortunately, this last week was also one of the busiest weeks of the semester, being midterms time. Due to this quite pressing engagement, we couldn't really celebrate. My cousin and I thought we should do something at least, however, as we are usually on Fall break when her birthday comes around. This year, however, our semester somehow got moved up a week, so we are actually on campus on her birthday.


I know that she likes chocolate. Instead of doing boring plain chocolate cake, however, I thought I'd alternate dark and white chocolate in a checkerboard cake. I decided to stick to two mudcake recipes (like the ones I used in the Christmas tree cake) but ended up with a bit less white chocolate mudcake than dark. I thus had to chop some off in order to make it somewhat equal. I thought I'd just chop off the top, domed part, and just stick a layer of white and a layer of dark, and invert 1/3 of that for a 2-layer cake.

As you can see, however, I ended up including the domed parts, cut into strips, for a third, somewhat smaller layer. I just didn't want the cake to be too flat... The strips of cake were attached together with a dark chocolate ganache.


I thawed some frozen strawberries (fresh ones being a bit too pricey now for my student wallet), drained them, and sliced them. I "glued" them over the seams on the top with some melted dark chocolate, then I arranged whatever leftover I had a bit around. These provided a nice refreshing touch to counter the sweetness of the chocolate. For contrast, I added words of white chocolate that I wrote on a small piece of baking paper and stuck in the freezer to set.


The two cakes should probably have been refrigerated before I cut them, as they somewhat crumbled when I tried arranging them right after they just cooled to room temperature. In the end, after the ganache and the cooling in the fridge, they stayed together nicely.


RECIPE
  Ingredients

     Dark Chocolate Mudcake
  • 1 1/4 cup flour
  • 1 cup sugar
  • 1/3 cup unsweetened cocoa powder
  • 1/2 tsp salt
  • 1 tsp baking soda
  • 1/3 cup vegetable oil
  • 1 cup tepid water
  • 1 tsp vinegar
  • 1 tsp vanilla extract
     White Chocolate Mudcake
  • 1 cup sifted flour
  • 2 tsp baking powder
  • pinch of salt
  • 1/4 cup sugar
  • 3/4 cup soymilk or other milk
  • 1/4 cup oil
  • 1 tsp vanilla extract
  • 1/2 tbs vinegar
  • 100 g white chocolate, melted
     Chocolate Ganache
  • 150 g chocolate, chopped
  • 75 mL (~1/3 cup) heavy cream
  Procedure

     Dark Chocolate Mudcake
  1. Preheat oven at 180°C. Grease and line a loaf pan.
  2. Sift together all dry ingredients. In a separate bowl, mix together wet ingredients.
  3. Make a well in the dry ingredients, and pour in the wet ingredients. Mix well
  4. Pour into the pan, and tap the pan against the table/working surface to release trapped bubbles.
  5. Bake 30-35 minutes or until well risen and a toothpick inserted in the middle comes out dry.
  6. Leave to cool in the tin for 20 mins, then remove to cool completely.
     White Chocolate Mudcake
  1. Preheat oven at 180°C. Grease and line a loaf pan.
  2. In a large bowl, mix the dry ingredients.
  3. Melt the chocolate.
  4. Add the soymilk, oil, chocolate, and vinegar to the dry ingredients mix.
  5. Mix until smooth.
  6. Pour into the pan, and tap it against the table or working surface to release trapped bubbles.
  7. Bake for 20-30 mins.
  8. Cool.
     Chocolate Ganache
  1.  Place the chocolate in a medium bowl.
  2. Heat cream until boiling.
  3. Pour cream over chocolate, and mix until all chocolate is melted.
     Assembly
  1. Cut the two cakes into even layers. Spread ganache on one of the layers, then top it with a layer of the other one. Repeat if there is sufficient cake remaining.
  2. Cut the assembly into 3, lengthwise.
  3. On a surface, set down the edge piece. Spread some ganache on the inside-facing side of it.
  4. Turn the middle row upside down, then set it next to the edge piece, pressing slightly for it to adhere.
  5. Spread more ganache on the bare side of the middle piece, and add the remaining edge piece.
  6. If desired, cover the whole cake in ganache or other icing.
  7. Refrigerate before serving.
      Tips

    • Ideally, the recipe quantities should be tweaked to make 2 cakes of equal height. In that case, 2 cakes of opposing patterns can be made.
    • Refrigerating the cakes before cutting them will make them a bit firmer and thus less likely to crumble.
    • If there are remaining cut-offs of the cakes (like from the domes), they can be made into cake pops.
    • Other cakes and flavors or icings can be used to make such a cake.
    • Using vegan chocolate and non-dairy cream will make this cake vegan.

      Saturday, October 17, 2015

      Lime and Strawberry Mini Cheesecake


      For reasons, I had to provide some baking samples a few days ago. I wasn't too sure of what to bake, and I wasn't in the mood for baking a cake like banana bread. I did not really have the ingredients for much else, so I opted for cheesecake (and even then I had to borrow butter from a neighbor).


      Inspired by the reunion cheesecake, I opted for a lime flavored base on top of a shortcrust pastry. I got distracted and thought we still had a jar of forest fruit jam, but I was mistaken. Therefore, I cooked, reduced, and crushed some frozen strawberries we still had, and topped the cheesecake with that. I made 4 of the same ones, in 10.5 cm springform pans.


      I then dug through the various sizes of boxes and cardboard in our recycling box, to find some way to package 3 of these so they wouldn't get crushed or fall while I biked to deliver these for the people who were going to sample them.


      Birthday Peach Cake and Apple Tart


      On the first weekend of October, I went home from the university in order to have a late celebration for my mom's birthday. She intended it to be more of a day during which to get together with members of the family and just have fun together, but I had more of a birthday in mind. So when she suggested just buying some pie or something from a shop, I rejected the idea.


      I wanted to try making a layered cake, so I tested out a recipe for a vegan sponge, but I am not 100% satisfied with it. I will try to play around with it some more before posting it. I made a double batch, which I cut in half. Then I decided I wanted a third layer, so I baked another single batch to put on top.


      I layered the cake with whipped cream to which I added vanilla sugar, and with slices of canned peaches. I then covered the top and sides with more whipped cream and peaches! I had originally planned to make more decorations over the top, but ran out of time.


      This cake was accompanied by my mom's favorite dessert: apple tart. I opted for several smaller roses in the middle instead of the usual huge one surrounded by apple slices.


      Apple tarts tend to be well received, since they are so simple and fruity. Tutorial here~


      Friday, October 2, 2015

      Murder Mystery Carrot Cake


      This week, an event that was a collaboration between two societies at the university (cooking and games) occurred. This was a Murder Mystery Dinner! I was asked if I wanted to bake and thus contribute to the dessert spread, and as I was being flooded in schoolwork, I (of course) decided to jump on it!


      I wanted to "catch up" on the lack of frosting and layering from the last cake I made for Cooking Society, so I went all out. I made a double batch of carrot cake in a 24 cm springform pan. The next day, I cut it into 2 layers, and made a frosting out of cream cheese, Greek yogurt (to increase the volume), and icing sugar. I spread this between the two layers, and on top of the cake, and piped some dollops with my new silicone piping bag and some piping tips that I never got to use before. Unfortunately, the frosting had warmed considerably at that point, and was not so firm.


      To keep up with the theme, I piped "Murder Mystery" with the crossed fork and knife logo of the cooking society, and added a smattering of powdered cinnamon on top.

      The baking paper is still visible, as I delivered it in the springform pan covered with a sheet of aluminum foil to keep dust and the like at bay. I decorated the cake during my lunch break, then went to class, while the cake rested in the fridge. I then came back to pick it up, and decided not to risk biking with a cake in my hand.

      Banana Bread Prize


      Last week, my university's Cooking Society had a "golden egg" hunt event, where students could win prizes for finding one of three eggs on campus. The chair of the society, and a friend of mine, asked me if I would like to contribute to the prices, either by providing a cake, or giving a baking workshop. As I cannot teach to save my life (last time I tried, it was horrible), I opted for providing a cake.


      My original plan was to make a carrot cake. Grating carrots, however, was not going to be feasible with the amount of time I had to bake this cake. Then I thought I would make a 2-layered banana bread, with cream cheese frosting in between, and maybe some caramel sauce drizzled on top. Me procrastinating on schoolwork did not allow for such fancifying of the cake, so I ended up with more or less plain banana bread.

      For a better visual, I put some banana slices on top of the cake before baking. The underside was dipped in flour to keep them from sinking, then the whole top was glazed in watered-down orange and ginger jam that my cousin had bought and left in the kitchen.


      I wrapped the loaf cake (1.5 times the recipe, so that it would be a little taller) in aluminum foil for transport, and added a piece of paper with the list of ingredients and possible allergens. I guess I kind of adopted the blue sakura (cherry blossom) paper punch-out as my symbol for gifts... I've been using it more and more.

      Recipe for banana bread here!

      Monday, September 28, 2015

      Tang Yuan


      Last week, we had an Asian-themed hallway dinner. I decided (like always) to make dessert. But which one?

      After some Internet lurking, I settled on Tang Yuan, also known as rice dumpling soup. It's a common winter dessert, most often known to be eaten during Chinese New Year.

      This is a sweet, unfilled version that was made with a ginger soup. I went with roughly 1/3 pink dumplings, and 2/3 white.

      RECIPE
        Ingredients (makes ~4 servings)
      • 1 cup glutinous rice flour
      • 1/2 cup water 
      • food coloring (optional)
      • ginger, as desired
      • brown sugar
        Procedure
      1. In a mixing bowl, mix the flour and water until a smooth dough is formed. If it crumbles, add some water. If it's sticky, add some flour.
      2. Divide the dough into the number of colors desired. Knead food coloring a drop at a time until the desired color is reached. 
      3. Cover the dough with a damp towel. Roll into balls of desired size.
      4. Cut ginger into slices, then pound it with the flat of the knife blade.
      5. In a pot, put water and ginger slices. Cook until a ginger tea is made.
      6. Add sugar until desired sweetness is reached.
      7. Bring another small pot of water to boil. 
      8. Dump in rice flour balls. They are cooked when they float.
      9. Put the balls into the sweetened ginger soup, and boil some more.
      10. Leave soaking for a few hours for the sweetness to enter the balls.
      11. Enjoy warm.

      Sunday, September 13, 2015

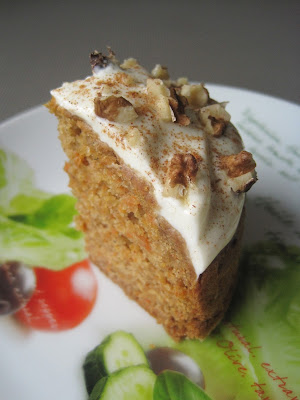
      Carrot Cake


      Phew, finally caught up on the backlog! Here is what I baked yesterday: Carrot cake!

      The main reason for this was because I had carrots laying around. The other reasons include, but are not limited to: I needed to de-stress, I have never made this before, and "why not?"


      The process to make the batter reminded me a lot of banana bread, except that I had grate the carrots instead of simply mashing my bananas. The ingredients used are similar, although I haven't really gone to see if the proportions are the same. Probably not, since bananas have a higher water content than do carrots.


      I adapted a recipe from Spice Up The Curry, although I changed some things according to personal preferences, such as cutting down the sugar and changing some sugar types. I made 2 small, pretty tall cakes instead of a larger, flatter one, though to be honest, I did not think it would rise that much even with the amount of leavening agents involved.


      The cake was frosted with an improvised cream cheese frosting, namely cream cheese, powdered sugar, and lime. The amounts? I kind of ad-libbed. I put some cream cheese in. Then I squeezed a small section of a lime in, tasted it... "Not sour enough." After a couple more times, it had enough of the citrus zing to it to match my imagined taste, but then I only had a small piece of lime left. "Oh well" preceded my squeezing of the rest of it in. Then I added a little bit more cream cheese because it had gotten pretty watery by then. Powdered/icing sugar was added to round off the sourness, then the whole bowl took an overnight nap in the fridge just because we were too full to eat last night, and I was not going to frost it ahead of time.


      For extra texture, I put some crushed walnuts over the top, and gave it all a bit of color with a dusting of cinnamon. This cake was nice and moist, which was very pleasant to eat.


      CARROT CAKE RECIPE
        Ingredients
      • 1 1/2 cup flour
      • 1 tsp baking powder
      • 1 tsp baking soda
      • 2 pinches salt
      • 1 tsp cinnamon
      • 1/4 tsp nutmeg
      • 1/4 cup + 2 tbs neutral oil
      • 1/4 cup golden sugar
      • 1/4 cup dark brown sugar
      • 1/4 cup soymilk
      • 1/4 cup water
      • 1 cup grated carrots
        Procedure
      1. Preheat oven 180°C.
      2. In a bowl, mix flour, baking powder, baking soda, salt, cinnamon, and nutmeg. Whisk well.
      3. In a mixing bowl, whisk sugars and oil. Add in soymilk and water and whisk well.
      4. Add in the flour mix in 2 times, mixing well each time.
      5. Fold in the carrots.
      6. Pour into a prepared pan, and bake for 25-30 minutes, or until a toothpick inserted comes out clean.

      Reunion Cheesecake


      August 8, 2015

      A week after my return from China and Hong Kong, I had a reunion with other alumni from my High School. Because we are spread all over the place, we had a mini European reunion for those of us based in Europe (and who could make it on that date).


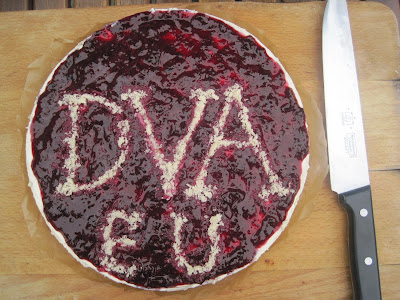
      We had a great barbecue, with skewers, corn, potatoes, salad, and more. Someone the week before had told me they missed the cheesecake our dorm mother used to make. Since I was hosting the event this time, and also since my recipe came from our dorm mom's recipe, I thought I would make cheesecake for our reunion dessert.


      I made a shortcrust pastry for the crust, and the filling is lime flavored. Due to not having enough Greek yogurt, I thought I would try baking it a little less time, to keep the cake from being too dried. Apparently, it was a good choice, since my cousin who has eaten many of my cheesecakes said this was one of the best.


      I topped it with a berry sauce made from blended frozen berries that I had let thaw, then reduced with some sugar to cut through the acidity. When I brought it out to the table (under the sunny sky), some others decided we should write DVA (the initials of our alumni association) on it. It wasn't very visible just carved out with a skewer, so I used some leftover almond powder I had to go over the letters.