Thursday, December 31, 2015

Lemon and Berry Cheesecake with Marzipan Mice


November 11, 2015

This cheesecake got lost between posts as I had taken pictures with my dad's camera, having forgotten my own. This was one of the many many desserts available for my niece's 5th birthday party.


The cheesecake itself was made in a manner that was similar to the reunion cheesecake, except with lemon, as I did not have any limes around. The last of the frozen berries I had used then to make the topping, so I watered down some red fruits jam.


The base is the usual shortbread pastry.


The focus point this time are these little family of mice I made to run on the serving plate that I borrowed from my cousin. They are made of plain marzipan, a bit of which I kneaded with chocolate powder to turn it brown. The eyes just have less chocolate. I made a baby one with inverted colors for some variety. Maybe one day, I'll post a tutorial how to make these, as I learned it from a book my brother has.

Saturday, December 26, 2015

Christmas '15: Pumpkin Yule Log Cake


Christmas desserts this year were split between my cousin B and myself. B made little choux and éclairs, and I dealt with the egg-free stuff for those among us that don't eat eggs. Having seen a recipe on Dash of (Vegan) Butter for a vegan pumpkin cream roll, and seeing how I still had a pumpkin sitting around, I jumped on the opportunity.

First, I roasted the pumpkin in the oven, puréed it in a food processor, then drained it in a colander with paper towels in the fridge to remove all excess moisture. Then I whipped up about 6 tbs of aquafaba (the liquid from a can of chickpeas), and proceeded with the rest of the recipe.


For the filling, I folded some whipped cream into the leftover cream cheese mix from the brownie topping. I also added a little more sugar. Then I cut a small section at the end to make a stump on top, which was glued on with more of the cream cheese mix.


The whole cake was covered with whipped cream that was mixed with chocolate powder. At first, I just dragged a fork over the whipped cream to make it seem like bark, but then opted instead to shave some chocolate off large choc chips (the only chocolate I had) to dust over the top.


In the end, the cake was well liked, but the cake batter was a little tough. Either I had overbaked it a bit, or the amount of dry ingredients should have been reduced.

PUMPKIN CAKE ROLL RECIPE
  Ingredients
  • 3/4 cup flour
  • 2 tsp cinnamon
  • 1 tsp baking powder
  • 1 tsp ground ginger
  • pinch of salt
  • 1/2 tsp ground nutmeg
  • 6 tbs aquafaba
  • 1/4 cup applesauce
  • 3/4 cup sugar
  • 2/3 cup puréed pumpkin
  • 1 tsp apple cider vinegar
  • icing sugar
  Procedure
  1. Preheat oven 180°C.
  2. In a bowl, combine dry ingredients. Set aside.
  3. Whip aquafaba on high until soft peaks. 
  4. On medium speed, add in applesauce, the progressively add sugar.
  5. Mix in pumpkin and vinegar.
  6. Fold in dry ingredients.
  7. Pour into a prepared pan, then bake for 15 min or until it springs back when lightly pressed.
  8. After removing from oven, immediately put on a clean dishtowel dusted with icing sugar.
  9. Roll it up with the towel and set to cool.
  10. Once cooled, unroll, fill with desired cream, and roll again.
  11. Ice as desired, and chill until eaten.

Christmas '15: Brownie with Cream Cheese Pattern


This year for Christmas presents, I decided to bake a big batch of brownie and cut it up into squares to pack up. I had originally planned to have 2 different brownies and some kind of gingerbread-like bars in there as well, but due to time constraints, I had to settle with just the one.


For the brownie, I used a double batch of the classic egg-free recipe I have been using. To make it a little more interesting, at least to the eye, I topped it with a pattern of cream cheese, quark, and icing sugar mix. The quark helped make the cream cheese more fluid, and I had some left from before that needed using up. The pattern was made by drawing lines of cream cheese mix over the top of the batter, then running a chopstick in opposite directions.


The wonderful image I had in mind for nice, even squares went out the window the moment I cut into it after cooling and refrigerating it a couple of hours. The no-crust parts were crumbling and falling every which way. Luckily, I managed to somehow cut 30 squares that were more or less intact, and to package them in little bags, each piece sitting on its own square of baking paper. Unfortunately, in some cases, the pattern did not really survive the cutting and packaging.

Lime Pistachio Shortbread Cookies


December 18, 2015

A friend had requested that I bake something for her (anything was fine). I also needed more cookies to give away as there was not enough mint chocolate cookies. This time I was extremely fed up with studying for exams, so I figured I could go and deal with a lime.

This recipe is adapted from Cooking Channel, although I did not use cardamom. I chopped the pistachio into stick-like slivers instead of crushing them or putting them through a blender.


I glazed them with the same lime glaze I have used before. As a last minute decoration, I slivered some lime zests and dropped them on top. The squares I had originally scored in the dough were a little big, so instead of re-drawing the lines, I split each in half to get triangles. I think these were the most fragile shortbreads I have made.

These were also packaged into little bags to give away, and served as snacks to go with tea for an end-of-semester get-together with friends.

Mint Chocolate Cookies


December 15, 2015

As the end of the semester approached, I wanted to give little packs of cookies to my professors, as thanks for teaching. I also felt that some of them had been particularly helpful to me this semester.

I looked around in my stash of baking ingredients, to see what kinds of cookies I could make with what I had. I had thought about chocolate chip cookies, but I didn't have anymore choc chips... No more cranberries either, and at the time I was starting to dig in my boxes, I was not up for zesting a lime. Then I saw a box of mint-filled chocolates I had gotten before but that was just sitting there. I figured I could try and put that on or in a cookie somehow.


My first test attempt was a flop and almost left a chunk of charcoal at the bottom of the oven. The cookie had fallen through the grill despite the baking paper (I neglected to put a pan between the paper and the grill), and had spread like crazy. Some flour and chilling later, I finally managed to get something decent.

The mint chocolates were cut into small rectangles/triangles depending on the part of the chocolate. I then stabbed them through the top of each cookie formed. Some pieces melted and caramelized on the sides of the cookies.  It might have been better if I had just stuck a bigger slab in the middle of each cookie, but I settled with what was done.

RECIPE
  Ingredients
  • 1 1/2 cup butter, softened
  • 1/2 cup golden sugar
  • 1 cup brown sugar
  • 1/2 tsp salt
  • 2 tsp Orgran egg replacer
  • 4 tbs water
  • 3 cups flour
  • 1 tsp baking soda
  • 2 tsp hot water
  • mint chocolate (or sub in 1 cup chocolate chips)
  Procedure
  1. Preheat oven 175°C.
  2. Cream butter and all sugar until fluffy.
  3. Mix the egg replacer and the 4 tbs water (proportions ~2 eggs) and beat them into the mixture.
  4. Dissolve baking soda into the hot water before adding.
  5. Stir in flour and chocolate chips.
  6. Put on baking sheet by large spoonfuls.
  7. Bake for 10-15 mins.

Homemade Gyoza (Potstickers)


Whew, lots of December things to catch up on here on the blog! Despite a crazy few weeks of exams and papers and presentations, I still managed to squeeze in some baking to get rid of some stress.

December 11, 2015

For a long time now, I've been wanting to make my own gyoza (Japanese potstickers), as they are a little hard to find in my corner of the world when I am at college. I found the gyoza skin recipe on La Fuji Mama and had it bookmarked for about a year before I finally got to it and made these.


First I made a pan of filling. To keep it relatively simple, I just stir-fried chopped Chinese cabbage, shiitake mushroom (dried and rehydrated), carrots, and ginger, which I seasoned with vegetarian oyster sauce. On hindsight, adding something to try and make it hold together more easily would have made wrapping the gyoza easier, but I was out of tofu and patience.

Then I made the skins, and rolled them out flat. As I am not proficient at making nice circles with just the rolling pin, I cheated by using a circle cutter to cut them out with.


Everything was kept under a wet towel while L and I wrapped them (she helped me to speed up the process). I think we made about 33 of them, though the dough was a bit too thickly rolled, and the thicknesses were uneven.


Then L helped me fry them on a nonstick pan until the bottom was nicely browned, before adding hot water to the pan and covering it, to steam the tops of the gyoza.


We ate these dipped in a mix of veg ponzu sauce (mix of soy sauce and citrus) and chili.

GYOZA SKIN RECIPE
  Ingredients
  • 2 cups all-purpose flour
  • 1/4 tsp salt
  • 1/2 cup boiling water
  • flour for dusting
  Procedure
  1. In a bowl, mix flour and salt. Make a well in the middle.
  2. With chopsticks or another utensil, add hot water in the well and mix in flour progressively until a dough is formed.
  3. Roll into a ball. Some more water may be required.
  4. Cover with a damp cloth and let site for 1 hour.
  5. Knead on a floured surface for about 5 mins.
  6. Form into a log and cut into about 40 slices.
  7. Roll into round skins (or use round cookie cutter to make circles), dusting both sides with flour.
  8. Fill and cook, or wrap in plastic wrap and refrigerate until use.

Sunday, December 6, 2015

Marbled Banana Brownie Wannabe


The original title for this post was going to be "marbled peanut butter and chocolate banana brownie wannabe," but since that is very long-winded, let's settle for the short version.

A week or two ago, my cousin L bought a bunch of bananas. As usual, they sat in the fruit basket getting riper and riper, until there was nothing left to do with them but to bake them. I am still not in the mood for banana bread (don't ask me why), so I thought I'd make another banana brownie. Then L saw the Facebook post from someone in the building saying they had leftover peanut butter brownie, and so she asked me if I could make it peanut butter this time.


To make things more difficult for myself, I thought I'd tackle a marbled peanut butter chocolate one. I simply made half of a batch of chocolate brownie batter (using half of the recipe in the link above), and half of a batch of an experimental peanut butter variant, which simply used 100 g of creamy peanut butter instead of the chocolate. Then I dolloped it progressively, alternating batters, into my loaf pan, and swirled it all with a knife.

Although the texture was amazingly soft and great to eat, it made it very difficult to cut the loaf and get decent slices that didn't collapse and break every which way. I'm still debating whether it's worth trying to fix that and possibly sacrifice the texture. To be determined in the future, I guess.

Lime Glazed Cranberry Shortbread Cookies


Remember these cranberry shortbread cookies I made last summer? Well I made them again, this time for a friend's birthday gift. I wasn't really up for rolling out the dough, however, so the dough was rolled into a log, then refrigerated. I then sliced the log into fairly irregular (I don't have much experience in cooking log cutting) slices, then baked them. Since I only made half a batch, my log was short enough that I could wrap it in cling film, and tie one end to the rack in the fridge, so that the surfaces didn't leave any flat side to my log.


Just like for the oatmeal cookies, I soaked the dried up cranberries in a bit of hot water before chopping them and throwing them into the mix. Instead of leaving them plain, I made a quick glaze with some icing sugar and lime juice, which I spread on half of the top surface of each cookie. The recipe for this glaze was from Cakecrumbs. The cookie recipe can be found in the link above.


LIME GLAZE
  Ingredients
  • 1 cup icing sugar
  • 1 tbs lime juice
  Procedure
  1. Mix together sugar and lime into a paste in a heat-proof bowl.
  2. Set the bowl into a pot of simmering water and heat until mix is runny.
  3. Glaze cookies, and let dry.

Wednesday, December 2, 2015

Cranberry Oatmeal Cookies


With all the academic deadlines flying around at this time of the semester, I needed to get rid of some stress. I had pulled an all-nighter the night before, and was trying to stay awake long enough to go to bed at a reasonably normal time.

I gave in to the temptation that had been gnawing at me for the past few days, but that I had to push away due to the aforementioned deadlines: BAKING.


Trying to think of what I wanted to make, I remembered the last of the dried cranberries sitting in one of the kitchen drawers. I used some for other cookies I will post in a few days, that I plan to give to a friend for her birthday. Then my cousin L (who is also my roommate) complained that I hadn't made normal cookies in a while for her to eat. I think she actually had chocolate chip in mind, but my stash of chocolate chips is long gone. I hit up Google, and came up with these cranberry oatmeal cookies.


The recipe is from Eggless Cooking, and makes more than the pictured 20 as plenty disappeared into L's stomach as I baked tiny batch after tiny batch of 6-7 in our tiny oven. The pack of cranberries had somehow ripped at some point, and wasn't closed properly, so the cranberries were dried up. I attempted to slightly rehydrate them in hot water before using them. I also subbed walnuts for the pecans.

RECIPE
  Ingredients
  • 3/4 cup (70 g) butter, softened; margarine makes this vegan
  • 1/4 cup cane sugar
  • 3/4 cup brown sugar
  • vanilla or 1 packet vanilla sugar
  • 1/2 cup non-dairy milk
  • 1 cup flour
  • 1/2 tsp baking soda
  • 1/2 tsp cinnamon, 1 pinch nutmeg
  • 3 cups quick cooking oats
  • 1 cup cranberries
  • 1 cup walnuts (optional)
  Procedure
  1. Preheat oven at 180°C.
  2. Cream sugars and butter until well combined.
  3. Add in milk, and mix.
  4. In a bowl, mix spices, flour, and baking soda. Add to the butter mix.
  5. Fold in oats, cranberries, and pecans.
  6. Spoon tablespoons of mix onto a lined baking tray. Flatten with a fork.
  7. Bake for 12-15 minutes.

Saturday, November 21, 2015

Vegan Banana Crêpes


After making the banana brownie, I still had 2 bananas left. I still wasn't up for banana bread, so I thought I would try making vegan crêpes with them. I found a recipe online, and thought I would give it a try. The weekend arriving was a perfect opportunity.


For a Saturday brunch, I whipped up this recipe of banana crêpes, and we enjoyed it with some leftover dulce de leche one of my cousins had given me. Then for more a more savory version, my cousin L shaved some cheese off a block we have, and rolled it in.


RECIPE
  Ingredients (makes about 12)
  • 250 g flour
  • 2 bananas
  • 500 mL non-dairy milk (I used hazelnut milk)
  • pinch of salt
  • pinch of baking powder
  • small spoon of sugar (optional)
  Procedure
  1. In a blender, blend sliced bananas and 100 mL milk.
  2. Mix to the rest of the milk.
  3. In a mixing bowl, combine dry ingredients.
  4. Slowly mix in the milk/banana mix, taking care to avoid making lumps.
  5. If too thick (which it was in my case), add more milk until it reaches desired consistency
  6. Cook a ladle-full or two at a time in an oiled pan on medium-high heat, flipping to cook both sides.
  7. Enjoy with topping of choice.

Banana Brownie


For a hallway dinner, I figured I should try and do something with the bananas I had left in the fruit basket. I wasn't really in the mood for banana bread, though, so I thought I would try and tweak my brownie recipe into one that would incorporate bananas.

I used mashed bananas instead of the applesauce, and added whatever chocolate I had left in my baking ingredients storage (which turned out to be mostly dark chocolate, with a small bit of white chocolate chips).

Dipping the bottom of the 12 banana slices in some flour kept them from sinking during the baking process. I also sprinkled some granulated cane sugar on top of the slices so that they would caramelize a bit, as well as to keep them from drying out.

RECIPE
  Ingredients (for a loaf pan)
  • 3/4 cup (94 g) flour
  • 1/4 tsp baking soda
  • 1 tsp baking powder
  • pinch of salt
  • less than 1/4 cup (~30 g) cane sugar
  • 1 1/2 (~70 g) mashed banana
  • 1 packet vanilla sugar
  • 3 tbs hot water
  • pinch of instant decaf/coffee
  • 200 g chocolate
  • 3 tbs (28 g) butter
  • 1/2 banana, for topping
  Procedure
  1. Preheat oven 180°C. 
  2. Oil and flour a loaf pan.
  3. Mix flour, baking powder, baking soda, and salt together in a bowl, and set aside.
  4. In a microwaveable bowl, put chopped chocolate and butter. Melt 30 seconds at a time in a microwave until the chocolate appears partly melted. Stir until smooth.
  5. In a large mixing bowl, whisk mashed banana, vanilla sugar, and sugar until melted.
  6. Add hot water and instant decaf/coffee.
  7. Add in the melted chocolate and mix well.
  8. Fold in the dry ingredients.
  9. Pour into pan. Slice the half banana, and dip one side in some flour before putting on top of the batter. Sprinkle some sugar on top of each slice.
  10. Bake for 25-30 minutes or until a toothpick comes out dry.
  11. Cool and enjoy with some ice cream or whipped cream (or both)~

Sunday, October 25, 2015

Chocolate Checkerboard Cake with Strawberries


Last Monday was one of my friends' birthday. Unfortunately, this last week was also one of the busiest weeks of the semester, being midterms time. Due to this quite pressing engagement, we couldn't really celebrate. My cousin and I thought we should do something at least, however, as we are usually on Fall break when her birthday comes around. This year, however, our semester somehow got moved up a week, so we are actually on campus on her birthday.


I know that she likes chocolate. Instead of doing boring plain chocolate cake, however, I thought I'd alternate dark and white chocolate in a checkerboard cake. I decided to stick to two mudcake recipes (like the ones I used in the Christmas tree cake) but ended up with a bit less white chocolate mudcake than dark. I thus had to chop some off in order to make it somewhat equal. I thought I'd just chop off the top, domed part, and just stick a layer of white and a layer of dark, and invert 1/3 of that for a 2-layer cake.

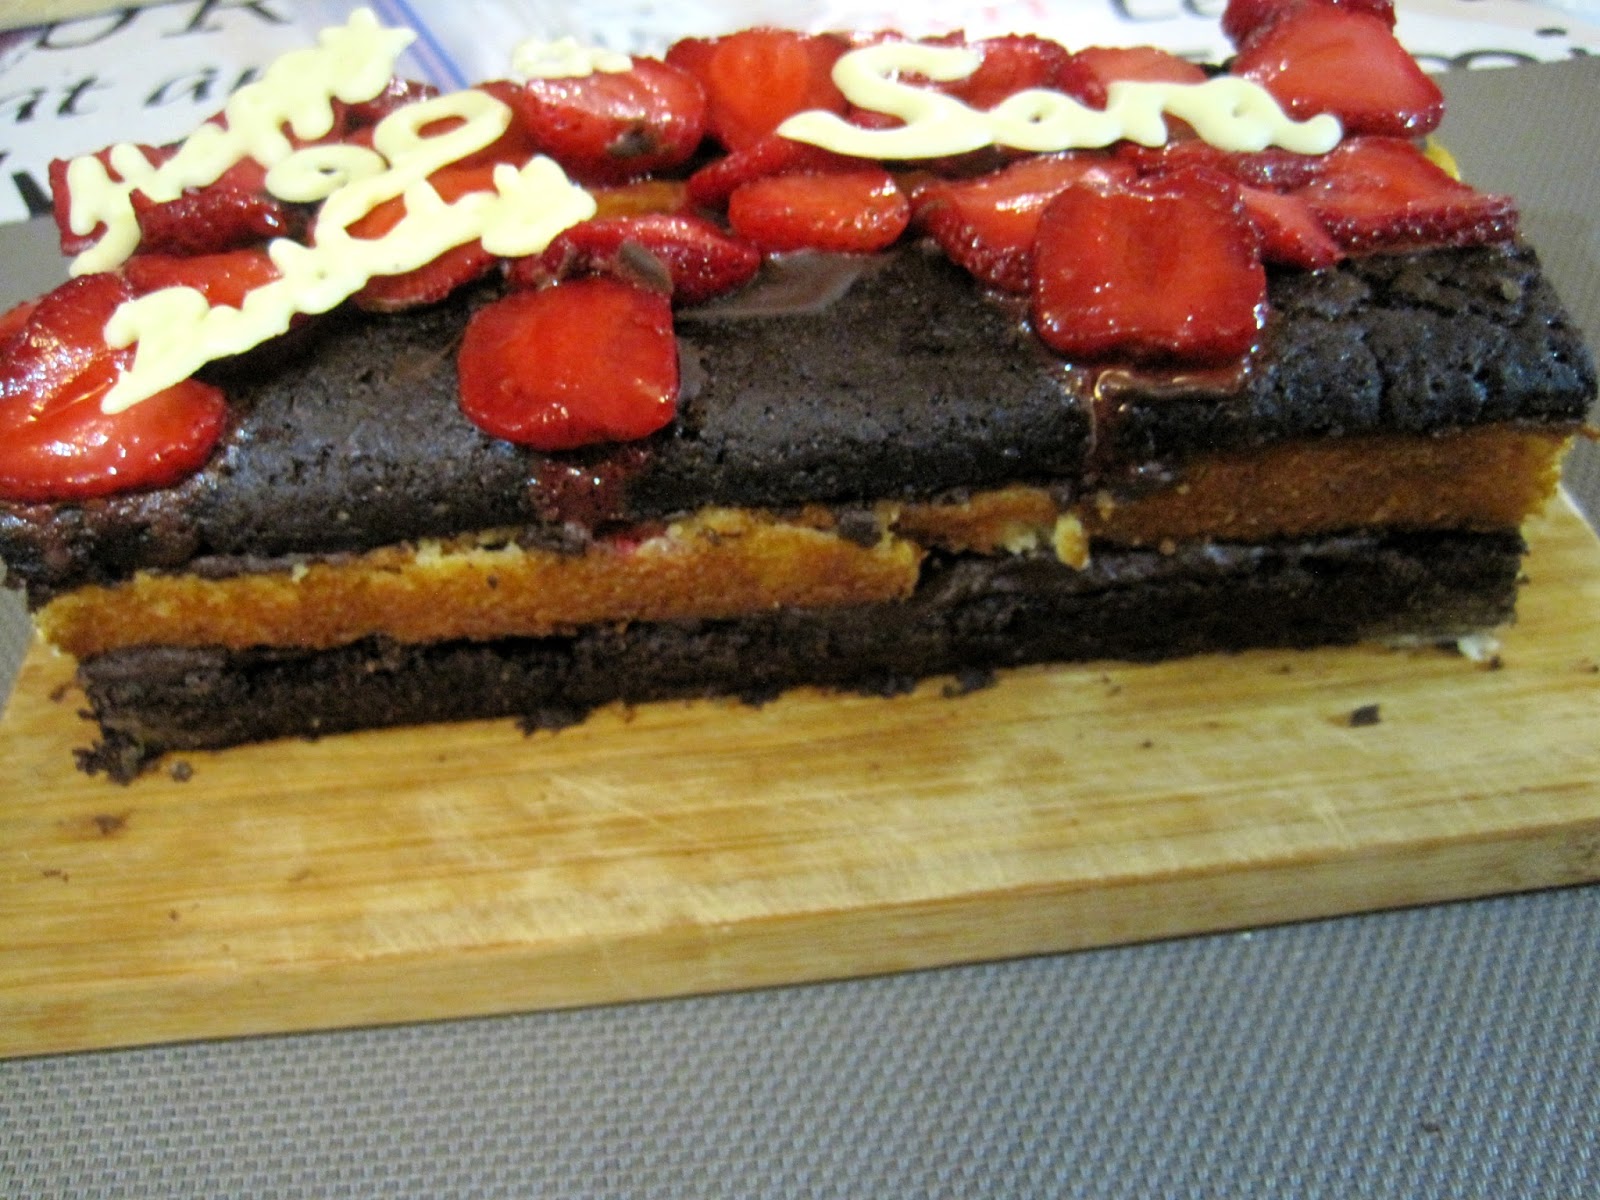
As you can see, however, I ended up including the domed parts, cut into strips, for a third, somewhat smaller layer. I just didn't want the cake to be too flat... The strips of cake were attached together with a dark chocolate ganache.


I thawed some frozen strawberries (fresh ones being a bit too pricey now for my student wallet), drained them, and sliced them. I "glued" them over the seams on the top with some melted dark chocolate, then I arranged whatever leftover I had a bit around. These provided a nice refreshing touch to counter the sweetness of the chocolate. For contrast, I added words of white chocolate that I wrote on a small piece of baking paper and stuck in the freezer to set.


The two cakes should probably have been refrigerated before I cut them, as they somewhat crumbled when I tried arranging them right after they just cooled to room temperature. In the end, after the ganache and the cooling in the fridge, they stayed together nicely.


RECIPE
  Ingredients

     Dark Chocolate Mudcake
  • 1 1/4 cup flour
  • 1 cup sugar
  • 1/3 cup unsweetened cocoa powder
  • 1/2 tsp salt
  • 1 tsp baking soda
  • 1/3 cup vegetable oil
  • 1 cup tepid water
  • 1 tsp vinegar
  • 1 tsp vanilla extract
     White Chocolate Mudcake
  • 1 cup sifted flour
  • 2 tsp baking powder
  • pinch of salt
  • 1/4 cup sugar
  • 3/4 cup soymilk or other milk
  • 1/4 cup oil
  • 1 tsp vanilla extract
  • 1/2 tbs vinegar
  • 100 g white chocolate, melted
     Chocolate Ganache
  • 150 g chocolate, chopped
  • 75 mL (~1/3 cup) heavy cream
  Procedure

     Dark Chocolate Mudcake
  1. Preheat oven at 180°C. Grease and line a loaf pan.
  2. Sift together all dry ingredients. In a separate bowl, mix together wet ingredients.
  3. Make a well in the dry ingredients, and pour in the wet ingredients. Mix well
  4. Pour into the pan, and tap the pan against the table/working surface to release trapped bubbles.
  5. Bake 30-35 minutes or until well risen and a toothpick inserted in the middle comes out dry.
  6. Leave to cool in the tin for 20 mins, then remove to cool completely.
     White Chocolate Mudcake
  1. Preheat oven at 180°C. Grease and line a loaf pan.
  2. In a large bowl, mix the dry ingredients.
  3. Melt the chocolate.
  4. Add the soymilk, oil, chocolate, and vinegar to the dry ingredients mix.
  5. Mix until smooth.
  6. Pour into the pan, and tap it against the table or working surface to release trapped bubbles.
  7. Bake for 20-30 mins.
  8. Cool.
     Chocolate Ganache
  1.  Place the chocolate in a medium bowl.
  2. Heat cream until boiling.
  3. Pour cream over chocolate, and mix until all chocolate is melted.
     Assembly
  1. Cut the two cakes into even layers. Spread ganache on one of the layers, then top it with a layer of the other one. Repeat if there is sufficient cake remaining.
  2. Cut the assembly into 3, lengthwise.
  3. On a surface, set down the edge piece. Spread some ganache on the inside-facing side of it.
  4. Turn the middle row upside down, then set it next to the edge piece, pressing slightly for it to adhere.
  5. Spread more ganache on the bare side of the middle piece, and add the remaining edge piece.
  6. If desired, cover the whole cake in ganache or other icing.
  7. Refrigerate before serving.
      Tips

    • Ideally, the recipe quantities should be tweaked to make 2 cakes of equal height. In that case, 2 cakes of opposing patterns can be made.
    • Refrigerating the cakes before cutting them will make them a bit firmer and thus less likely to crumble.
    • If there are remaining cut-offs of the cakes (like from the domes), they can be made into cake pops.
    • Other cakes and flavors or icings can be used to make such a cake.
    • Using vegan chocolate and non-dairy cream will make this cake vegan.

      Saturday, October 17, 2015

      Lime and Strawberry Mini Cheesecake


      For reasons, I had to provide some baking samples a few days ago. I wasn't too sure of what to bake, and I wasn't in the mood for baking a cake like banana bread. I did not really have the ingredients for much else, so I opted for cheesecake (and even then I had to borrow butter from a neighbor).


      Inspired by the reunion cheesecake, I opted for a lime flavored base on top of a shortcrust pastry. I got distracted and thought we still had a jar of forest fruit jam, but I was mistaken. Therefore, I cooked, reduced, and crushed some frozen strawberries we still had, and topped the cheesecake with that. I made 4 of the same ones, in 10.5 cm springform pans.


      I then dug through the various sizes of boxes and cardboard in our recycling box, to find some way to package 3 of these so they wouldn't get crushed or fall while I biked to deliver these for the people who were going to sample them.


      Birthday Peach Cake and Apple Tart


      On the first weekend of October, I went home from the university in order to have a late celebration for my mom's birthday. She intended it to be more of a day during which to get together with members of the family and just have fun together, but I had more of a birthday in mind. So when she suggested just buying some pie or something from a shop, I rejected the idea.


      I wanted to try making a layered cake, so I tested out a recipe for a vegan sponge, but I am not 100% satisfied with it. I will try to play around with it some more before posting it. I made a double batch, which I cut in half. Then I decided I wanted a third layer, so I baked another single batch to put on top.


      I layered the cake with whipped cream to which I added vanilla sugar, and with slices of canned peaches. I then covered the top and sides with more whipped cream and peaches! I had originally planned to make more decorations over the top, but ran out of time.


      This cake was accompanied by my mom's favorite dessert: apple tart. I opted for several smaller roses in the middle instead of the usual huge one surrounded by apple slices.


      Apple tarts tend to be well received, since they are so simple and fruity. Tutorial here~


      Friday, October 2, 2015

      Murder Mystery Carrot Cake


      This week, an event that was a collaboration between two societies at the university (cooking and games) occurred. This was a Murder Mystery Dinner! I was asked if I wanted to bake and thus contribute to the dessert spread, and as I was being flooded in schoolwork, I (of course) decided to jump on it!


      I wanted to "catch up" on the lack of frosting and layering from the last cake I made for Cooking Society, so I went all out. I made a double batch of carrot cake in a 24 cm springform pan. The next day, I cut it into 2 layers, and made a frosting out of cream cheese, Greek yogurt (to increase the volume), and icing sugar. I spread this between the two layers, and on top of the cake, and piped some dollops with my new silicone piping bag and some piping tips that I never got to use before. Unfortunately, the frosting had warmed considerably at that point, and was not so firm.


      To keep up with the theme, I piped "Murder Mystery" with the crossed fork and knife logo of the cooking society, and added a smattering of powdered cinnamon on top.

      The baking paper is still visible, as I delivered it in the springform pan covered with a sheet of aluminum foil to keep dust and the like at bay. I decorated the cake during my lunch break, then went to class, while the cake rested in the fridge. I then came back to pick it up, and decided not to risk biking with a cake in my hand.

      Banana Bread Prize


      Last week, my university's Cooking Society had a "golden egg" hunt event, where students could win prizes for finding one of three eggs on campus. The chair of the society, and a friend of mine, asked me if I would like to contribute to the prices, either by providing a cake, or giving a baking workshop. As I cannot teach to save my life (last time I tried, it was horrible), I opted for providing a cake.


      My original plan was to make a carrot cake. Grating carrots, however, was not going to be feasible with the amount of time I had to bake this cake. Then I thought I would make a 2-layered banana bread, with cream cheese frosting in between, and maybe some caramel sauce drizzled on top. Me procrastinating on schoolwork did not allow for such fancifying of the cake, so I ended up with more or less plain banana bread.

      For a better visual, I put some banana slices on top of the cake before baking. The underside was dipped in flour to keep them from sinking, then the whole top was glazed in watered-down orange and ginger jam that my cousin had bought and left in the kitchen.


      I wrapped the loaf cake (1.5 times the recipe, so that it would be a little taller) in aluminum foil for transport, and added a piece of paper with the list of ingredients and possible allergens. I guess I kind of adopted the blue sakura (cherry blossom) paper punch-out as my symbol for gifts... I've been using it more and more.

      Recipe for banana bread here!