Thursday, September 12, 2013

Prince (Apple-Cinnamon) Cheesecake


It all began with a journal posted by *claremanson on DeviantArt. She was hosting a baking contest! I thought it was awesome, and decided that I wanted to take part in it.

Because the theme was an Oreo cheesecake based on *claremanson's recipe, I had a bit of trouble visualizing what I would do. Why? Well, because there are no Oreos to be found in the vicinity of my normal shopping area. I wasn't too keen on going around different stores to try and find those cookies, or some knock-off brand, so I took the closest thing I could find at Colruyt: Mini Prince vanilla-filled cookies.


After finding these cookies at the store, I thought I would start with a couple of test runs to test the flavors I had in mind. Because this is a no-bake cheesecake, it is much easier to do a couple of tiny practice cheesecakes. The one on the left was a test of the cinnamon flavored cheesecake, and the one on the right has plain vanilla cheesecake. They are topped with applesauce, lightly roasted apple slices, and 1/4 of a cookie each.


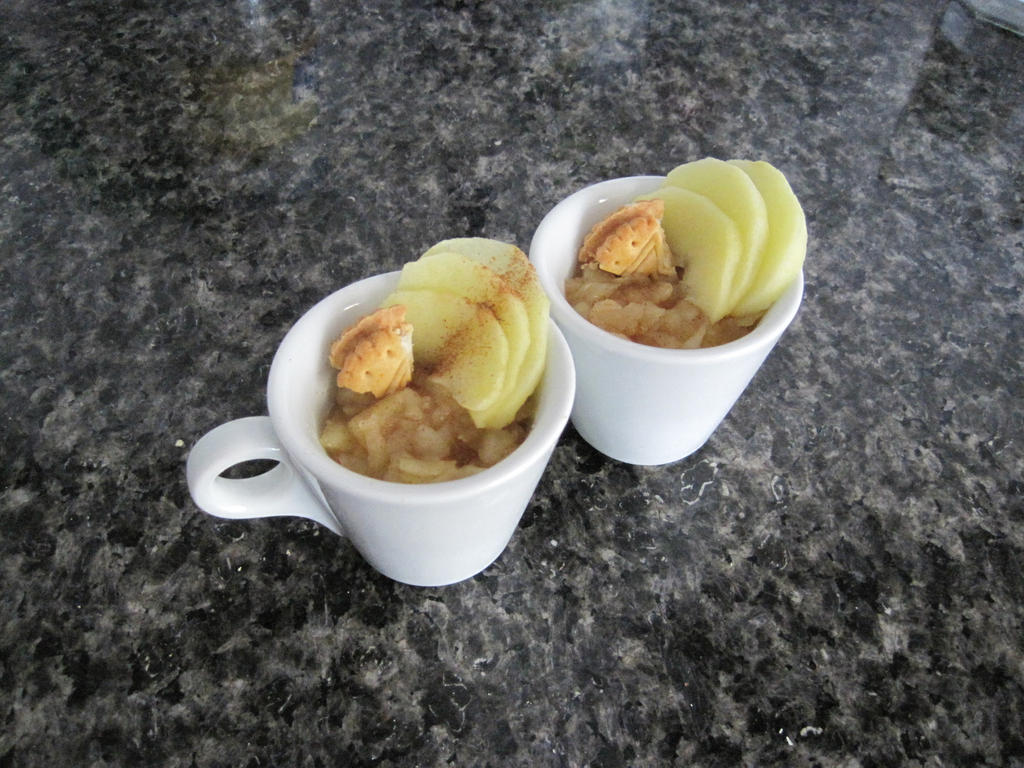
I wanted to stay away from the heavy cream, so I also tested to see how well it would set with yogurt instead. Worked wonderfully.

Now that I had the flavors in mind, and a rough idea for the presentation, I did a couple of concept sketches (in Paper). I varied from the recipe on these points:

  • No Oreos.
  • Vanilla is boring, so I used a cinnamon flavor.
  • Used yogurt instead of heavy cream.
  • Made it fruity for the summer with apples, to match with cinnamon (we all know I love the apple and cinnamon combo).

Then got to work on the final product. I had issues with the sugar mix not wanting to become caramel, and the burning me after it did... I started by trying to make a small batch of this microwave caramel sauce recipe, which didn't caramelize (maybe because I didn't have corn syrup so tried it out with honey instead...). I ended up using this recipe (I made a quarter batch), which turned out deliciously addicting. It took me around a whole afternoon, plus the time to finish up the decoration to finish it all.


I borrowed my dad's professional Canon camera to take these sunny pictures, so that the shots would be better quality than if taken with my Canon Powershot. (Which caused a whole issue with the fact that my dad had lost his Compact Flash card reader, and I had to get the pictures through cord... and the camera not being recognized by Windows 7, etc...)


I also made a bunch of smaller ones (4 the size of the test runs, and 3 in larger coffee cups), but they were mostly used as rough drafts for the decoration components, and therefore not fit for photography.


The contest winners were announced today. I didn't win anything, but got an honorable mention ^^

Thursday, August 22, 2013

Veggie-ful lunch~

I haven't had much time not chance to cook a lot these days... What with exams, and stress, I was lucky to have a cousin over to help cook for me while my parents are gone on vacation.

My cousin left last night, though, so I had to feed myself. I remembered there were a few endives in the fridge, so I originally planned to make a salad. Somehow, I felt it was too boring, so I thought I'd make something a little different.


Chicon bites! (chicon is the term used in Belgium for endives)

Basically, I took the endive leaves and cut them in half to make curved boat-like recipients, in which I spooned a bit of filling. The whole plate was made with just 1 endive, 1 tomato, a few pieces of tofu skin log (it's kind of like an alternative to meat... it has a slightly sweet and savory flavor).


I ate a late breakfast with another cousin, and she had leftover salad dressing. So I mixed that with the diced ingredients, chopped some Vietnamese perilla, and filled my endive leaves. I also made a few cuts in the heart of the endive and poured some dressing inside.

The dressing is made of grainy mustard, salt, sugar, pepper, olive oil, and some balsamic vinegar. I topped the whole thing with some more perilla.

I accompanied it all with a small amount of carrot matchsticks and a yogurt dip in which I mixed a bit of oregano, a hint of paprika, and a speck of cinnamon.


Monday, August 5, 2013

Onigiri!

Once again home alone, with some leftover salty, poached tofu in the fridge and leftover rice in the rice cooker, I thought "hey, I can try making onigiri!" (onigiri are rice balls, sometimes with filling, usually wrapped in nori seaweed)


Some of them contain chopped poached tofu and chopped boiled carrots, others have a chopped tofu and mayo mix. I had some leftover chopped carrots, so I added them as a side.

I mixed in some salt, sugar, and rice vinegar into the rice to make sushi rice, just for fun and additional flavor. I even tried making faces with the nori seaweed, but they're kind of failed... =D

Spinach Tortilla rolls

August 1, 2013


I was home alone, and needed to make dinner. But I was too lazy to do anything too intricate, and there was also a lack of ingredients in the fridge. I settled for what I could find.

RECIPE
  Ingredients
  • tortillas
  • frozen spinach
  • cream cheese
  • tofu
  • salt and pepper to season
  • plain yogurt
  Procedure

  1. Thaw the spinach in a pot, then boil out most of the excess moisture.
  2. Put oil in a pan and lightly fry the crumbled tofu (I like calling it "scrambling the tofu" because it's almost like making some scrambled eggs). Season with salt and pepper.
  3. Warm up tortillas according to package instructions.
  4. Add cream cheese to the spinach, then spread on the tortilla, leaving space at the edges.
  5. Sprinkle on the scrambled tofu.
  6. Fold the side edges of the tortilla, then roll it. Stick a toothpick at the 1/3 and 2/3 points of the roll to hold it closed.
    Optional: put a thin strip of normal cheese between the flap and the body of the roll so that when it melts, it acts like glue.
  7. Bake the whole thing at 180°C for about 5 mins.
  8. Enjoy dipped in some plain yogurt for added creaminess, and that hint of tart freshness.

Curry

July 7, 2013


Just some more homemade curry. Pretty much the same overall process as this one, except that I didn't have mushrooms and cashews, so I settled for some frozen green peas.

Sandwich

June 12, 2013


Just a sandwich I made for lunch one day. The particularity is that I tried marinating some tofu slices in a ginger-soy sauce-sugar marinade before baking them.

Some of the leftover pieces were left in the still-warm oven, and surprisingly turned into something similar in texture to commercial fake meat.

I tried reproducing the effect, but it didn't work out... Will have to figure out how exactly it all happened, then I'll post it here ^^

Birthday Cupcakes and Truffles

June 9, 2013


June 8th was the birthday of someone who is very important to me. I wanted to give her something special, but had no chance to make anything intricate. So I settled for cupcakes. The recipe for the cake is this basic vegan cake recipe (it's almost my go-to recipe for cakes nowadays), except without the matcha. I made some large cupcakes as well as some mini ones.

The frosting is the same as well, except that I tried to give it a slight strawberry flavor by mixing in some strawberry jam. The difference in moisture content (as well as a lack of time resulting in insufficient cooling of the mixture) led to it having a weird, almost unmixed aspect >.<


Some of the mini cupcakes fell apart when I tried to take them out of the silicone mold, so I thought I would try to make some impromptu cake truffles that I've read about on so many blogs. I put the broken cupcakes in a blender to turn it into cake crumbs, and mixed in leftover frosting to make it stick together. I formed little balls, stuck toothpicks in them, then dipped them in melted chocolate.

I had a few issues with the cake balls not staying on the toothpick while dipping in the chocolate. After looking it up, it would seem that it's best to refrigerate the uncoated truffles before dipping them. It will be worth trying another time (with maybe less sugar in the cake/frosting mix).


For the end result, I packed a couple of large cupcakes with a few of the mini ones, and a bunch of truffles, into an aluminum pan (kind of like those that pre-cooked lasagna comes in at the store, because that's all I had), decorated it all, and gave it as a present, with a card.


Thursday, August 1, 2013

Home-popped popcorn

May 30, 2013


Simply some corn kernels tossed in olive oil and some salt, then microwaved. I'm not skilled/patient enough yet to pop my corn in a pot...

Homemade Chunky Roots Curry

May 28, 2013
I tried making some curry...


Apparently, it was good enough that my cousin (who did some taste-testing before I served) said she could have a reaction (refer to Yakitate! Japan manga about that).

Served with some baguette and a cucumber salad.

In addition to the ingredients listed below, I have also tried using some of the "helper ingredients" found on the following image from Addicted to Curry (manga). Some may deem it unwise to follow a fictional manga for cooking, but I wanted to try. Some of the additions turned out very helpful.


Unfortunately, I didn't write down the recipe, so the following will be an approximation.

Ingredients:
- carrots
- potatoes
- mushrooms
- tomatoes
- cashews
- tofu
- curry powder
- ginger
- mushroom seasoning

Procedure:
1. Cut the carrots and potatoes in even chunks. Boil water and cook the carrots.
2. Once cooked, remove the carrot from the water, and use the same water to cook the potatoes.
3. Reserve some cooking liquid, and add some mushroom seasoning.
4. In a bigger saucepan, heat a little bit of neutral oil, and add in minced ginger and a bit of curry powder. Add in cut mushrooms.
5. Sauté mushrooms until cooked, then add in the carrots and potatoes, reserving 2 or 3 chunks of potatoes aside.
6. Add in the liquid from step 3. Crush the reserved chunks of potatoes and add in (this will thicken the curry without adding more starch).
7. Add more curry powder and seasoning as seems fit, then throw in diced tofu, diced tomatoes and halved cashews.
8. Let simmer on medium-low heat, then serve.

For the cucumber salad:
1. Slice cucumbers fairly thinly.
2. Make a dressing out of lemon juice, salt, pepper, and a hint of sugar.
3. Mix

The cucumber salad will help to cut the fire of the curry.

Crumble du Chat Qui Tousse

May 22, 2013
I have no idea why this crumble is named after a coughing cat. Trust me, I tried looking it up, but nothing came up...

Sorry for the low quality picture, it's due to the fact that it 
was evening, and the whole thing was still steaming...

Recipe from Marmiton.org, halved.

Ingredients:
- 3 apples
- 75 g brown sugar
- 75 g flour
- 50 g butter (take out half an hour ahead of time)
- ground cinnamon
- vanilla sugar
- the juice of half a lemon

Procedure:
1. Preheat oven 210°C
2. Core, peel and roughly dice apples. Spread in an oven dish and pour lemon juice, cinnamon, and vanilla on top.
3. In a bowl, mix flour and brown sugar. Add in small cubes of butter, and mix by hand until obtaining a sandy dough.
4. Spread this dough on top of the apples.
5. Bake for 30 mins.

This is what happens when you watch too much Top Chef...

May 21, 2013
Around this time, I was still watching a lot of Top Chef (we recorded it since I was never able to watch it when it was airing).

So my mom made a self-service type dinner, and this is what I did with my food.


It's pretty ridiculous, but I was being very silly at the time.

Egg-free chocolate cake

It's been a while since I last posted on this blog, but it was due to a huge lack of time. While I still occasionally baked and cooked, I hadn't gotten the chance to upload the pictures and recipes.

Instead of doing a huge post on everything, I'll go by item/dish/recipe. So there will be a lot of posts coming up today.

May 15, 2013


So one day, my aunt came over and brought a tablet of 70% dark chocolate for baking. I hadn't had many chances or motivations to bake chocolate cakes in the past (except for a failed fondant), but I thought I would give it another try, seeing how my aunt bought the chocolate just for that.

The cake has a weird-ish appearance due to the fact that I flipped it on a plate before flipping it again onto the serving plate. So it has the indented shape of the bottom of a plate.

I can't seem to recall where I got the recipe, but anyways, it was a recipe in French.

RECIPE
  Ingredients
  • 250 g chocolate
  • 150 g butter
  • 150 g flour
  • 100 g sugar
  • 150 mL (3/4 cup) milk
  Procedure
  1. Preheat oven 200°C.
  2. Melt the chocolate and butter together in the microwave.
  3. In a mixing bowl, mix flour, sugar, and milk.
  4. Add the melted chocolate and butter.
  5. Pour into a prepared tin.
  6. Bake for 25 min.
  7. Turn off the oven and leave the cake inside for 5 more minutes.
  8. Remove, let cool, and sift powdered chocolate over the top.

Monday, May 13, 2013

Mother's Day tart


This year's Mother's Day was a scramble for ideas for me. I didn't know what to do, nor did I really have much time, seeing how I had to study and prepare for exams (that are coming up really fast). Then, yesterday, I saw how many apples were sitting in the fruit baskets and getting riper and riper, with no one intent on eating them. Lucky for me, I still had one pastry dough in the freezer.

The apples ended up being catastrophic for me, in the sense that when I got up this morning, those apples that had been sitting in the basket vanished. Turns out one of my relatives brought time to my aunt's house, where there are many people to eat them. After a short hunt, I came across three apples... Not enough for my plans.

After some asking around, I got my hands on a few other apples, and I could finish my tart the way I wanted to!

Seeing how it's Mother's Day, and also because I could never do anything to fill the center of my apple tarts without them looking awful, I decided to go for an apple rose in the center. Which was also a disaster on its own at first, since the thin apple slices would break instead of bending. In these situations, Google is a very good friend. Zapping my slices in the microwave for 30 seconds did the trick.


The recipe below is an improved version of this one.

Recipe
Ingredients:
- 1 store-bough pastry dough
- 4-5 apples (depending on your pan size and apple sizes)
- water
- sugar
- cinnamon powder

  1. Peel and dice 2 apples. Put in a small saucepan with half a teaspoon of sugar and a bit of cinnamon. Cover with water, bring to boil, and lower the heat to simmer for about 20 mins.
  2. Put pastry dough in tart tin and poke holes everywhere. Bake at 200°C for about 5-10 mins until the surface begins to crisp (looks drier than when first put into oven).
  3. Remove apples from water and mash with a fork into applesauce. Reserve apple flavored water. Spread into even layer on top of the pastry, at the bottom of the tart.
  4. Sprinkle with cinnamon.
  5. Peel and slice remaining apples. Dispose them as you wish.
    Tip:
    If you want to make a rose, zap those apple slices in the microwave for about 30 secs to be able to roll them.
  6. Sprinkle with more cinnamon.
  7. Bake at 200°C for about 30 mins or until apple slice edges are browned.
  8. Boil down the remaining apple flavored water with some added sugar until syrupy.
  9. Remove tart from oven. Using a spoon, brush the syrup onto the apple slices to glaze.
  10. Enjoy~

Tuesday, April 30, 2013

Homemade Ciabatta

I made ciabatta twice so far. The first, I split the dough into two loaves, and sprinkled them with some herbs. They weren't very well  baked, but after a re-bake the next day, the crust was delicious.


This second time, I made a single loaf. I can't say the inside is as I wished (it's more of a cake-like texture), but the crust is good =D. I also added a tablespoon of olive oil in the dough because I read that it would improve the breadcrumb's texture... I am not sure if it was enough...


Recipe:
Ingredients:
- 500 g (4 cups) all-purpose flour
- 2 cups warm water
- 1/4 tsp yeast
- 1 tsp salt

Tip: Water shouldn't be too hot. If it feels about the same temperature as your body, or comfortable on your wrist, it's fine.
1. In a bowl, mix water and yeast.
2. Add flour and salt. Mix well.
3. Cover and let rise for 8-12 hours. It will double in size.
4. Put a baking sheet on a pan, and add flour to it.
5. Carefully drop dough onto pan, and roughly give it a slipper shape.
6. Bake at 200°C with a pan of water underneath for steam. I baked for about 30 mins, but bake until the top looks browned.

Enjoy~

Monday, April 22, 2013

Vegan Matcha Cupcakes and Cake


I had this urge to bake something, yesterday... So I went online and looked for a good vegan cake recipe, seeing how my last few batches of cupcakes were too dense. I came across a Very Vanilla Vegan Cupcakes recipe from Whipped Baking, and I knew I just had to try it.


Due to the necessity for speed when dealing with recipes using the chemical reaction between vinegar and baking soda, I couldn't just stand there and wait for my first batch of cupcakes to be done before finishing the batter, so I poured it all into a small cake tin.


Recipe~
Ingredients:
- 1 3/4 cups all-purpose flour
- 1 cup sugar
- 1 tsp baking powder
- 1 tsp baking soda
- 1/2 tsp salt
- 1 cup unsweetened plain soymilk
- 1/2 cup neutral oil
- 2 tbs vanilla extract (I didn't have extract, so I used a vanilla syrup... 2 tbs is fine, and not too strong)
- 1 tbs white or apple cider vinegar (I used white so that it didn't interfere with the matcha)
- matcha powder

Procedure:
1. Preheat oven 180°C
2. Line tin(s)
3. In a large bowl, whisk together all the dry ingredients.
4. In a medium bowl, whisk together all the wet ingredients.
5. Pour the wet into the dry and whisk until just combined. Do not over mix.
6. Pour into tin(s) and bake around 15 mins for cupcakes, or 25 mins for a cake, or until a toothpick comes out dry.

I used around 30g matcha powder, but the flavor was very subtle... So I'll have to test some more to find the right proportions.

The only non-vegan aspect is in the frosting.

Frosting recipe~
Ingredients:
- 5 tbs flour
- 1 cup milk (I used soymilk)
- vanilla extract
- 1 cup softened butter
- sugar

Procedure:
1. In a small saucepan, whisk flour into milk. Place on stovetop and heat until thickened. Let cool to room temperature.
2. Add in some vanilla.
3. In a bowl, whip butter with sugar until light and fluffy.
Note: I tend to estimate the amount of sugar differently each time, to ensure it's not too sweet. This time, I made a quarter of a batch of frosting, with about 2 tsp of sugar.
4. Add the completely cooled milk-flour mix and beat until it reaches the consistency of whipped cream.
5. Spread or pipe on cupcakes of choice.

Tuesday, April 16, 2013

Mug cake

I've been seeing a lot of recipes online for mug cakes, but most of them contained an egg. Then, I came across a couple of blogs (Made from Scratch and Novice Chef) where it was mentioned that it doesn't make sense to put a whole egg into a mug cake when a whole egg is enough for a whole tray of cupcakes. Yay for me, since I didn't want to use egg in the first place.


This picture is from my very first try. I've made it a couple of times afterwards, but they all look the same anyways.

I've tried changing it by using 2 tsp of matcha instead of cocoa powder, but the flavor didn't come out much, so it will be to try for another time.

Mug cake
Ingredients:
- 2 tbs flour
- 2 tsp cocoa powder
- 1/2 tsp sugar
- 2 tbs milk
- 1/4 tsp baking powder
- 1 tbs peanut butter or any such substance (others have used nutella. I used speculoos spread)

1. Mix the dry ingredients thoroughly with a fork, in a mug (make sure the mug is microwaveable).
2. Add the wet ingredients, and mix well, making sure to leave no dry pockets of flour.
3. Drop in the peanut butter (or whichever you're using) and push gently to submerge it in the batter.
4. Microwave for about 1 minute on high (you'll have to test with your microwave...)
5. Enjoy~ (also delicious with a scoop of ice cream)

Monday, April 15, 2013

Cooking spamming~

I've been cooking and baking a lot of late, but never got a chance to post it all up. So this post will be a spam of all I've done lately (dates included)!

March 30, 2013
Chocolate chips and walnut cookie~ Some of the cookies were without chocolate by request. I made a good 100 of them, so that I could share them with a lot of people.


April 1, 2013
Pasta salad~ Macaroni mixed with an avocado-yogurt sauce, topped with minced endives, tomatoes, kidney beans, feta cheese, walnuts, and rucola.


April 2, 2013
Veggie patty~ Made with broccoli, corn, tofu, and a flour-water mix to hold it all together. Coated in breadcrumbs before frying.


April 3, 2013
Apple tart


April 4, 2013
Plateful of snacks... Blood orange, apple, and banana, along with some walnuts and almonds, and some toasted spelt bread with cream cheese.


Had some tortilla wraps for dinner. I made two very frequently eaten dishes in our house: sautéed crumbled tofu and oven-baked zucchini. Put them out with some shredded iceberg lettuce, a can of corn, and a variety of sauces (mayonnaise, honey mustard, and ketchup), and everyone could make their tortilla wraps as they chose to.


Oven-baked zucchini:
Dice or slice your zucchini. Toss with a spoonful of olive oil or oil of choice. If desired, add some Italian seasoning. Bake until desired texture.

Crumbled tofu:
Crumble the tofu in your hands, then drop onto a frying pan with a bit of hot oil. Sauté until colored and dryer. Add some salt or any other seasoning of choice.

April 12, 2013
Cheesecake time! This time, I tried my best to take some progress pictures, but -- as you will be able to tell -- I couldn't snap a shot of each step.

Tiramisu cheesecake
1. Take speculoos cookies, put them in a bag, and crush the bag with a rolling pin until the cookies are crumbs. Add melted butter.

2. Mix until all the crumbs are wet.

3. Press into bottom of a pan covered with a baking sheet. If necessary, use the flat bottom of a glass to help.

4. Next, mix your cheesecake ingredients together. (I would say about 375 g sour cream for 600 g cream chesse)
I flavored this cheesecake with some decaf and a lot of sugar. Also added small pieces of speculoos throughout.

5. Bake.

I used the leftover sour cream as a sweet sour cream topping. Result:

6. Decorate. I have a new decorating syringe, so I tried it out with some whipped cream, and put powdered cocoa on it all.


I made another cheesecake, this one with an almond cookie crust and a vanilla flavor. Topped with whipped cream, caramelized cookie crumbs, sliced almonds, and strawberries.


 And with candles, because it was my birthday cheesecake =D